Tuesday, September 17, 2019

Free bead pattern: Keyhole Bracelet


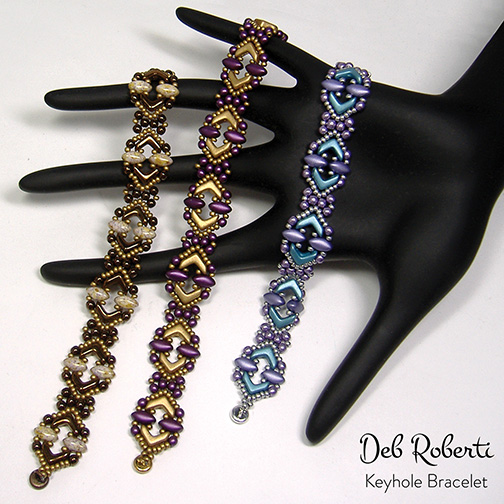
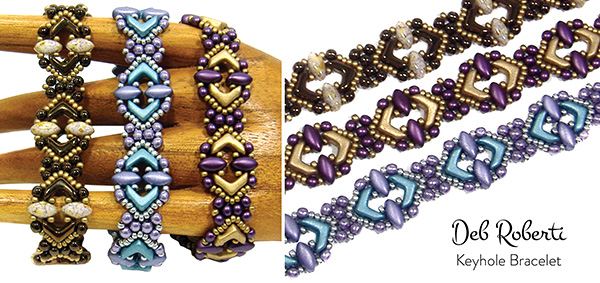
Keyhole Bracelet, free EVA bead pattern

Keyhole Bracelet

(©2019 Deborah Roberti)


 The Keyhole Bracelet features two-hole EVA beads (6x9mm two-hole chevron-shaped beads) and IrisDuo beads (7x4mm two-hole marquise-shaped beads) manufactured by PotomacBeads.com.
You can purchase EVA and IrisDuo beads here:
U.S.: https://www.potomacbeads.com

Links to exact beads used at the end of the page.

 
MATERIALS
(for a 7-inch bracelet, not including clasp)
• About 3 yards of 6 lb. FireLine
• About 200 size 11/0 Miyuki rocaille seed beads
• About 64 size 3mm round beads (druk, glass pearl or Minos Par Puca beads)
• About 14 IrisDuo beads (7x4mm two-hole marquise-shaped beads)
• About 14 two-hole EVA beads (6x9mm two-hole chevron-shaped beads)
• clasp
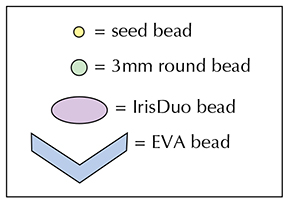


For this tutorial, the EVA beads should be positioned the way they appear in my illustrations as you add them.

Step 1: Thread your needle with about 3 yards of FireLine (or more realistically, start with a length that you are comfortable working with and add more as you need it).

Leaving a 10-inch tail for attaching your clasp, go up through the left hole of an EVA bead, through a seed bead, the right hole of an IrisDuo bead and another seed bead:


NOTE: You will not be making a knot until Step 4 so keep the tension tight and hold onto this tail thread for now.

Step 2: Go up through the left hole of a new EVA bead.

String seven seed beads.

Go around and down through the right hole of the same EVA bead that you just added:


Step 3: String a seed bead, go down through the left hole of another IrisDuo bead and string a seed bead. Go down through the right hole of the first EVA bead that you added (highlighted in RED):
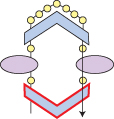


Step 4: String seven seed beads. Grab your tail thread from Step 1 and tie a tight double knot:
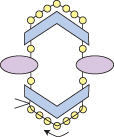


Step 5: Go back up and around through beads highlighted in RED:
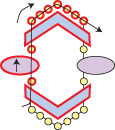


Step 6: String a seed bead, a 3mm round bead and a seed bead.

Go down through the right hole of the IrisDuo bead highlighted in RED:
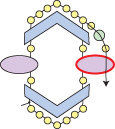


Step 7: String a seed bead, a 3mm round bead and a seed bead.

Go back around through the seven seed beads along the bottom of the motif (highlighted in RED):
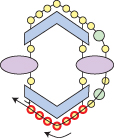


Step 8: String a seed bead, a 3mm round bead and a seed bead.

Go up through the left hole of the IrisDuo bead highlighted in RED:
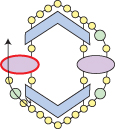


Step 9: String a seed bead, a 3mm round bead and a seed bead.

Go back up through the four seed beads along the top of the motif (highlighted in RED):
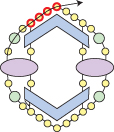


You just finished the first Keyhole Bracelet motif and you will repeat the steps that follow to add more.

Step 10: String a 3mm round bead, a seed bead and a 3mm round bead.

Go around and back across through the seed bead that you just exited (highlighted in RED):
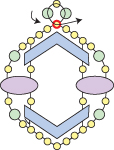


Step 11: Go back around through the beads that you just added (highlighted in RED):
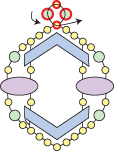


Step 12: Go back up through the beads highlighted in RED:
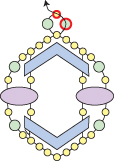


Step 13: String three seed beads, go up the left hole of a new EVA bead, string another seed bead, go up the right hole of a new IrisDuo bead and string one more seed bead:
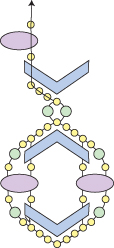


Step 14: Go up through the left hole of another new EVA bead.

String seven seed beads.

Go around and down through the right hole of the same EVA bead that you just added:
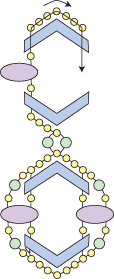


Step 15: String a seed bead, go down through the left hole of another new IrisDuo bead and string a seed bead.

Go down through the right hole of the EVA bead that you added earlier (highlighted in RED):
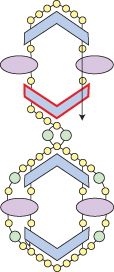


Step 16: String three seed beads. Go around through the four seed beads along the bottom of the motif (highlighted in RED):
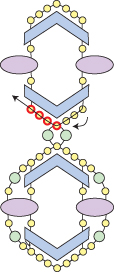


Step 17: String a seed bead, a 3mm round bead and a seed bead.

Go up through the left hole of the IrisDuo bead highlighted in RED:
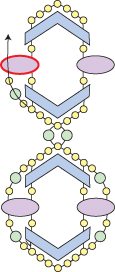


Step 18: String a seed bead, a 3mm round bead and a seed bead.

Go back around through the seven seed beads along the top of the motif (highlighted in RED):
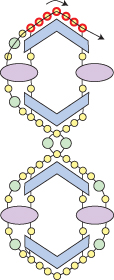


Step 19: String a seed bead, a 3mm round bead and a seed bead.

Go down through the right hole of the IrisDuo bead highlighted in RED:


Step 20: String a seed bead, a 3mm round bead and a seed bead.

Go back around through the five seed beads along the bottom of the motif (highlighted in RED):
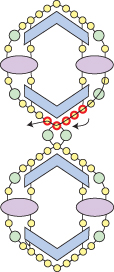


You just finished the second Keyhole motif. Next you will add some 3mm round beads and seed beads between the motifs.

Step 21: String a 3mm round bead, a seed bead and a 3mm round bead. Go around and back across through the three seed beads along the top of the motif below (highlighted in RED):
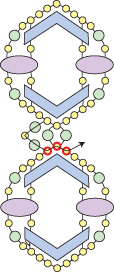


Step 22: String a 3mm round bead, a seed bead and a 3mm round bead. Go around and back across through the five seed beads along the bottom of the top motif (highlighted in RED):
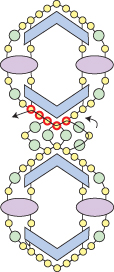


Step 23: Go back up through the beads highlighted in RED:
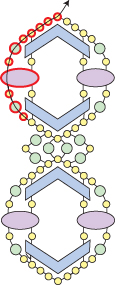


Step 24: Repeat Step 10 to Step 23 until your bracelet is the length you want it, minus the length of your clasp and about a third-inch:


Step 25: To attach your clasp, string two seed beads.

Go through your clasp and then back through the last seed bead that you just strung:
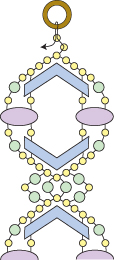


NOTE: To make your bracelet longer, just add more beads (or larger beads) than directed in this step and the next.

Step 26: String another seed bead.

Go back across through the seed bead highlighted in RED:
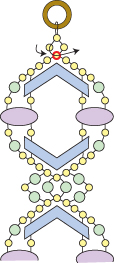


Step 27: Go back around through the beads highlighted in RED and the clasp to reinforce your attachment to the clasp:
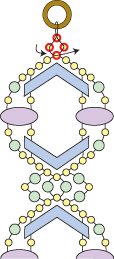


Weave back into your bracelet, knot in several places and cut your thread.

Step 28: To attach the clasp to the other end of your bracelet, thread your needle with the tail thread from Step 1.

Go up through the seed beads highlighted in RED:
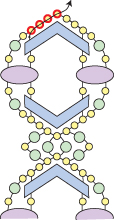


Repeat Steps 25-27.


Keyhole Bracelet, free EVA bead pattern

Bronze verion (left):
• About 200 size 11/0 Miyuki rocaille seed beads: Aztec Gold 11-55127
• About 64 size 3mm round beads: Dark Bronze
• About 14 IrisDuo beads: White Lila Gold Luster
• About 14 two-hole EVA beads: Jet Bronze

Purple verion (middle):
• About 200 size 11/0 Miyuki rocaille seed beads: Aztec Gold 11-55127
• About 64 size 3mm round beads: Pearl Coat Purple Velvet
• About 14 IrisDuo beads: Pastel Bordeaux
• About 14 two-hole EVA beads: Aztec Gold

Lavender/Aqua verion (right):
• About 200 size 11/0 Miyuki rocaille seed beads: Aluminum Silver 11-131-01700
• About 64 size 3mm round beads: Saturated Metallic Ballet Sipper
• About 14 IrisDuo beads: Metallic Violet
• About 14 two-hole EVA beads: Metallic Aqua

Sunday, September 15, 2019

Free SuperDuo pattern: SuperDuo Triangle Weave Band

Free SuperDuo Triangle Weave pattern


SuperDuo Triangle Weave Band

 
Many of you have tried my free Triangle Weave Band tutorial that uses single-hole crystal beads but the triangle weave stitch (a variation of right-angle weave) also works great with two-hole beads like SuperDuo beads!


MATERIALS
(for a 7-inch bracelet, not including the length of your clasp)
• About 4 yards of 6 lb. FireLine
• About 250 size 11/0 Miyuki rocaille seed beads
• About 32 size 15/0 Miyuki rocaille seed beads
• About 35 size 4mm beads (I used fire-polished beads but any type of 4mm bead will work fine)
• About 102 SuperDuo beads (SuperDuos can be one color, two different colors, three different colors or a combination of solid colors and SuperDuo Duet beads)
• clasp


Step 1: Start with a length of FireLine that you are comfortable working with and add more as you need it.

Leaving about a 10-inch tail for attaching one end of your clasp, string an 11/0 seed bead, a 4mm bead, an 11/0 seed bead, a 4mm bead, an 11/0 seed bead and three SuperDuo beads.

Tie the beads in a circle with a tight double knot:


Step 2: Go back around through the beads that you just strung (highlighted in RED):


NOTE: In the steps that follow, you’ll be adding SuperDuo beads in sets of three. Each set can be all one color, two different colors, three different colors or a combination of solid colors and SuperDuo Duet beads—the color combinations are endless. As you add each set of three SuperDuo beads, make sure that the outer SuperDuo bead holes are open and not clogged.

Step 3: Go back around through the 11/0 seed bead, the 4mm bead, the 11/0 seed bead and the 4mm bead highlighted in RED:


Step 4: String an 11/0 seed bead, a 4mm bead, an 11/0 seed bead, three SuperDuo beads and an 11/0 seed bead.

Go around and up through the 4mm bead that you just exited (highlighted in RED):


Again, make sure the outer holes of the three SuperDuo beads are open and not clogged.

Step 5: Go back around through the beads that you just added (highlighted in RED):


Step 6: Go back around through the 11/0 seed bead and the 4mm bead highlighted in RED:


Step 7: String an 11/0 seed bead, a 4mm bead, an 11/0 seed bead, three SuperDuo beads and an 11/0 seed bead, making sure that the outer holes of the three SuperDuo beads are open as you add them.
Go around and down through the 4mm bead that you just exited (highlighted in RED):


Step 8: Go back around through the beads that you just added (highlighted in RED):


Step 9: Go back up through the 11/0 seed bead and the 4mm bead highlighted in RED:


Step 10: String an 11/0 seed bead, a 4mm bead, an 11/0 seed bead, three SuperDuo beads and an 11/0 seed bead, making sure that the outer holes of the three SuperDuo beads are open as you add them.
Go around and up through the 4mm bead that you just exited (highlighted in RED):


Step 11: Go back around through the beads that you just added (highlighted in RED):


Step 12: Repeat Step 6 to Step 11 until your band is the length you want, minus about a quarter-inch and the length of your clasp:


Step 13: Go around through the 11/0 seed bead, the 4mm bead and the 11/0 seed bead highlighted in RED:


Step 14: String two 11/0 seed beads and go through the outer hole of the SuperDuo bead highlighted in RED:


Next you will add 11/0 seed beads in the gap between the SuperDuo beads and 15/0 seed beads in between each set of three SuperDuo beads.

Step 15: String an 11/0 seed bead. Go across through the outer hole of the middle SuperDuo bead in this set of three SuperDuo beads (highlighted in RED).

String another 11/0 seed bead. Go across through the outer hole of the last SuperDuo bead in this set of three SuperDuo beads (highlighted in RED):


Step 16: String a 15/0 seed bead. Go through the outer hole of the SuperDuo bead in the next set of three SuperDuo beads (highlighted in RED):


Step 17: String an 11/0 seed bead. Go across through the outer hole of the middle SuperDuo bead in this set of three SuperDuo beads (highlighted in RED).

String another 11/0 seed bead. Go across through the outer hole of the last SuperDuo bead in this set of three SuperDuo beads (highlighted in RED):


Step 18: Repeat Step 16 and Step 17 all the way across the bottom of the band, adding 11/0 seed beads between each SuperDuo bead and 15/0 seed beads in between each set of three SuperDuo beads:


Step 19: String two 11/0 seed beads. Go up through the two 11/0 seed beads, the 4mm bead and the 11/0 seed bead above (highlighted in RED):


Step 20: String two 11/0 seed beads and go through the outer hole of the SuperDuo bead highlighted in RED:


Step 21: Repeat Step 15 to Step 18 all the way across the top of the band, adding 11/0 seed beads between each SuperDuo bead and 15/0 seed beads in between each set of three SuperDuo beads:


Step 22: String two 11/0 seed beads. Go down through the two 11/0 seed beads and 4mm bead highlighted in RED:


Step 23: To attach your clasp, string two 11/0 seed beads. Go through your clasp and then back through the last 11/0 seed bead that you just strung:


NOTE: To make your band longer, just add more seed beads than directed in this step and the next.

Step 24: String four 11/0 seed beads. Go back down through the 4mm bead highlighted in RED:


Step 25: Go back around through the beads highlighted in RED and the clasp several times
to reinforce your attachment to the clasp:


Use excess thread to go back through the beads along the outer edges, knot in several places and cut your thread.

Step 26: To attach the clasp to the other end of your band, thread your needle with the tail thread from Step 1. Weave your way around through the beads highlighted in RED and repeat Step 23 to Step 25: