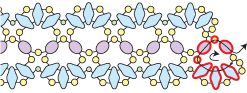
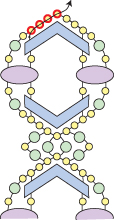
Keyhole Bracelet
(©2019 Deborah Roberti)

The Keyhole Bracelet features two-hole EVA beads (6x9mm two-hole chevron-shaped beads) and IrisDuo beads (7x4mm two-hole marquise-shaped beads) manufactured by PotomacBeads.com.
Links to exact beads used at the end of the page.
(for a 7-inch bracelet, not including clasp)
• About 3 yards of 6 lb. FireLine
• About 200 size 11/0 Miyuki rocaille seed beads
• About 64 size 3mm round beads (druk, glass pearl or Minos Par Puca beads)
• About 14 IrisDuo beads (7x4mm two-hole marquise-shaped beads)
• About 14 two-hole EVA beads (6x9mm two-hole chevron-shaped beads)
• clasp
For this tutorial, the EVA beads should be positioned the way they appear in my illustrations as you add them.
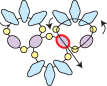
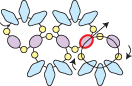
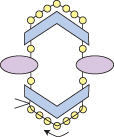
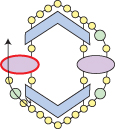
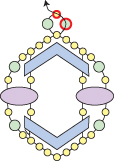
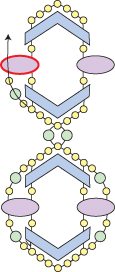
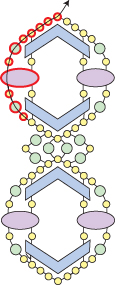
Leaving a 10-inch tail for attaching your clasp, go up through the left hole of an EVA bead, through a seed bead, the right hole of an IrisDuo bead and another seed bead:

NOTE: You will not be making a knot until Step 4 so keep the tension tight and hold onto this tail thread for now.
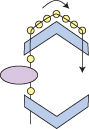
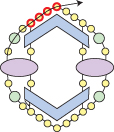
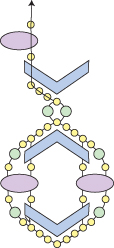
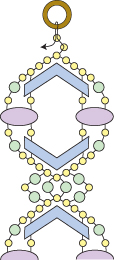
Step 2: Go up through the left hole of a new EVA bead.
String seven seed beads.
Go around and down through the right hole of the same EVA bead that you just added:
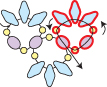
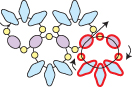
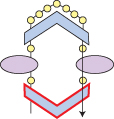
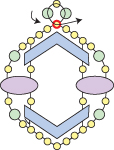
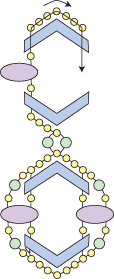
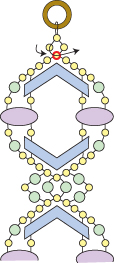
Step 3: String a seed bead, go down through the left hole of another IrisDuo bead and string a seed bead. Go down through the right hole of the first EVA bead that you added (highlighted in RED):
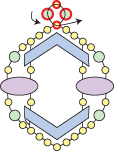
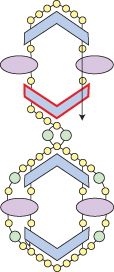
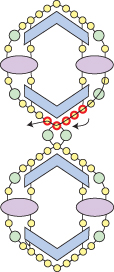
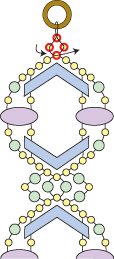
Step 4: String seven seed beads. Grab your tail thread from Step 1 and tie a tight double knot:
Step 5: Go back up and around through beads highlighted in RED:
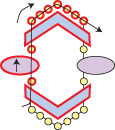
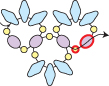
Step 6: String a seed bead, a 3mm round bead and a seed bead.
Go down through the right hole of the IrisDuo bead highlighted in RED:
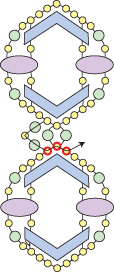
Step 7: String a seed bead, a 3mm round bead and a seed bead.
Go back around through the seven seed beads along the bottom of the motif (highlighted in RED):
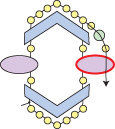
Step 8: String a seed bead, a 3mm round bead and a seed bead.
Go up through the left hole of the IrisDuo bead highlighted in RED:
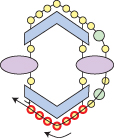
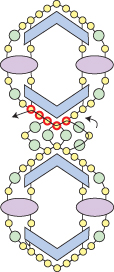
Step 9: String a seed bead, a 3mm round bead and a seed bead.
Go back up through the four seed beads along the top of the motif (highlighted in RED):
You just finished the first Keyhole Bracelet motif and you will repeat the steps that follow to add more.
Step 10: String a 3mm round bead, a seed bead and a 3mm round bead.
Go around and back across through the seed bead that you just exited (highlighted in RED):
Step 11: Go back around through the beads that you just added (highlighted in RED):
Step 12: Go back up through the beads highlighted in RED:
Step 13: String three seed beads, go up the left hole of a new EVA bead, string another seed bead, go up the right hole of a new IrisDuo bead and string one more seed bead:
Step 14: Go up through the left hole of another new EVA bead.
String seven seed beads.
Go around and down through the right hole of the same EVA bead that you just added:
Step 15: String a seed bead, go down through the left hole of another new IrisDuo bead and string a seed bead.
Go down through the right hole of the EVA bead that you added earlier (highlighted in RED):
Step 16: String three seed beads. Go around through the four seed beads along the bottom of the motif (highlighted in RED):

Step 17: String a seed bead, a 3mm round bead and a seed bead.
Go up through the left hole of the IrisDuo bead highlighted in RED:
Step 18: String a seed bead, a 3mm round bead and a seed bead.
Go back around through the seven seed beads along the top of the motif (highlighted in RED):

Step 19: String a seed bead, a 3mm round bead and a seed bead.
Go down through the right hole of the IrisDuo bead highlighted in RED:

Step 20: String a seed bead, a 3mm round bead and a seed bead.
Go back around through the five seed beads along the bottom of the motif (highlighted in RED):
You just finished the second Keyhole motif. Next you will add some 3mm round beads and seed beads between the motifs.
Step 21: String a 3mm round bead, a seed bead and a 3mm round bead. Go around and back across through the three seed beads along the top of the motif below (highlighted in RED):
Step 22: String a 3mm round bead, a seed bead and a 3mm round bead. Go around and back across through the five seed beads along the bottom of the top motif (highlighted in RED):
Step 23: Go back up through the beads highlighted in RED:
Step 24: Repeat Step 10 to Step 23 until your bracelet is the length you want it, minus the length of your clasp and about a third-inch:

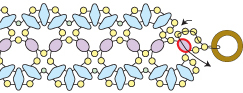
Step 25: To attach your clasp, string two seed beads.
Go through your clasp and then back through the last seed bead that you just strung:
NOTE: To make your bracelet longer, just add more beads (or larger beads) than directed in this step and the next.
Step 26: String another seed bead.
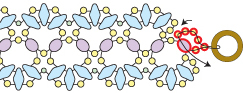
Go back across through the seed bead highlighted in RED:
Step 27: Go back around through the beads highlighted in RED and the clasp to reinforce your attachment to the clasp:
Weave back into your bracelet, knot in several places and cut your thread.
Step 28: To attach the clasp to the other end of your bracelet, thread your needle with the tail thread from Step 1.
Go up through the seed beads highlighted in RED:
Repeat Steps 25-27.

Bronze verion (left):
• About 200 size 11/0 Miyuki rocaille seed beads: Aztec Gold 11-55127
• About 64 size 3mm round beads: Dark Bronze
• About 14 IrisDuo beads: White Lila Gold Luster
• About 14 two-hole EVA beads: Jet Bronze
Purple verion (middle):
• About 200 size 11/0 Miyuki rocaille seed beads: Aztec Gold 11-55127
• About 64 size 3mm round beads: Pearl Coat Purple Velvet
• About 14 IrisDuo beads: Pastel Bordeaux
• About 14 two-hole EVA beads: Aztec Gold
Lavender/Aqua verion (right):
• About 200 size 11/0 Miyuki rocaille seed beads: Aluminum Silver 11-131-01700
• About 64 size 3mm round beads: Saturated Metallic Ballet Sipper
• About 14 IrisDuo beads: Metallic Violet
• About 14 two-hole EVA beads: Metallic Aqua