Thursday, October 24, 2019

Right-Angle Weave Tutorial: Easy Crystal Bracelet

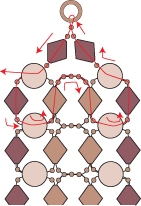
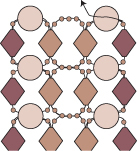
Easy Crystal Bracelet, a free right-angle weave tutorial


Easy Crystal Bracelet

2006 Deborah Roberti)


An easy right-angle weave tutorial!

Materials:
  • 3 yards waxed Nymo or C-Lon thread, size D, or 6lb FireLine, whichever is your preference
  • About 100 size 11/0 seed beads or Delica beads
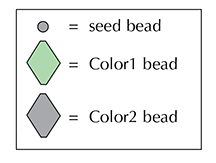
  • About 78 size 4mm Color1 beads (can be any bead type—bicone, round, fire-polished, etc.)
  • About 78 size 4mm Color2 beads (can be any bead type—bicone, round, fire-polished, etc.)
  • clasp
 

Step 1: Thread your needle with 3 yards of Nymo, C-Lon or FireLine (or start with a length that you are comfortable working with and add more as you need it).

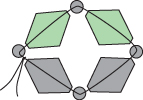
String a seed bead, a Color1 bead, a seed bead, a Color1 bead, a seed bead, a Color2 bead, a seed bead and a Color2 bead.

Leaving a 10-inch tail for attaching the clasp, tie the beads in a circle with a double knot:


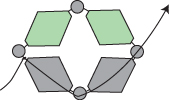
Step 2: Go back through the Color2 bead, the seed bead, the Color2 bead and the seed bead:


Step 3: String a Color2 bead, a seed bead, a Color2 bead, a seed bead, a Color1 bead, a seed bead and a Color1 bead. Go around and up through the seed bead you exited at the beginning of this step (highlighted in RED):
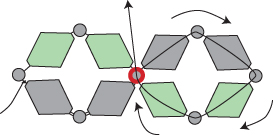


Step 4: Continue back on through the Color2 bead, the seed bead, the Color2 bead and the seed bead that you added in the last step:
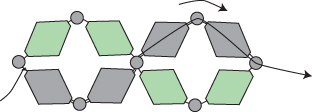


Step 5: String a Color2 bead, a seed bead, a Color2 bead, a seed bead, a Color1 bead, a seed bead and a Color1 bead. Go around and down through the seed bead that you exited at the beginning of this step (highlighted in RED):


Step 6: Continue back on through the Color2 bead, the seed bead, the Color2 bead and the seed bead that you added in the last step:


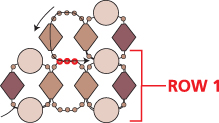
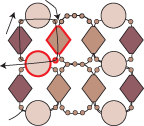
Step 7: Repeat Steps 3 to 6 until your bracelet is about a half-inch short of the length you want it (not including the clasp):


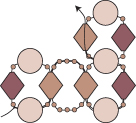
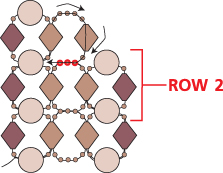
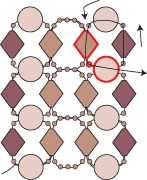
Step 8: Go back through the Color1 bead and the seed bead highlighted in RED:
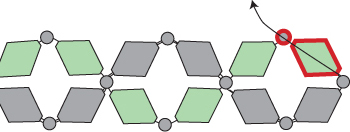


Step 9: String a Color1 bead, a seed bead and a Color2 bead. Go through the next seed bead on the row below (highlighted in RED):
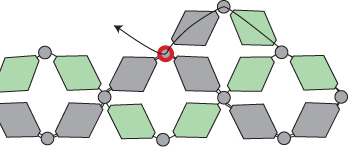


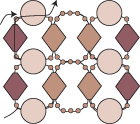
Step 10: String a Color2 bead, a seed bead and a Color1 bead. Go though the next seed bead on the row below (highlighted in RED):
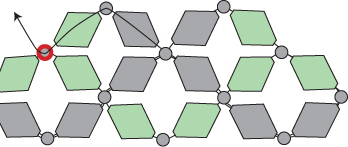


Step 11: Repeat steps 9 and 10 until you get to the end of the bracelet:


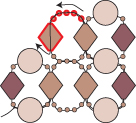
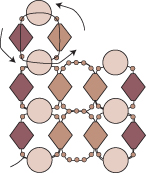
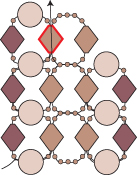
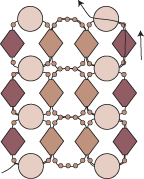
Step 12: Go around through the Color1 bead, the seed bead, the Color2 bead and the seed bead (highlighted in RED):
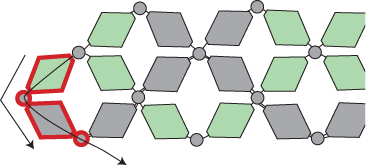


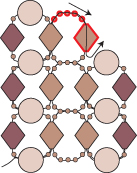
Step 13: String a Color2 bead, a seed bead and a Color1 bead. Go through the seed bead on the row above (highlighted in RED):
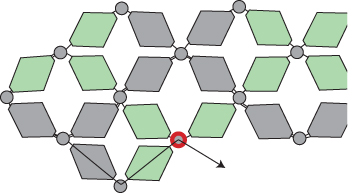


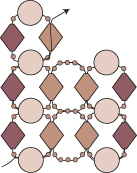
Step 14: String a Color1 bead, a seed bead and a Color2 bead. Go though the next seed bead on the row above (highlighted in RED):
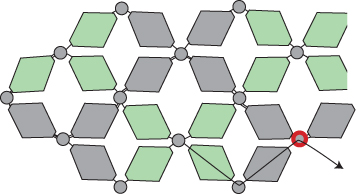


Step 15: Repeat steps 13 and 14 until you come to the end of the bracelet:


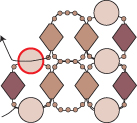
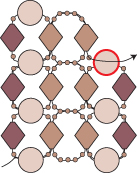
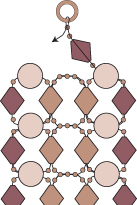
Step 16: Go through Color2 bead and exit out of the seed bead:
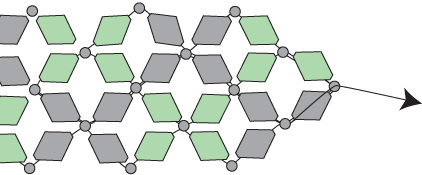


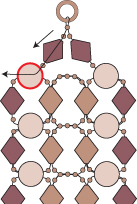
Step 17: To attach the clasp, string two seed beads, go through your clasp and back through the last seed bead that you just strung. String another seed bead and go back through the seed bead that you exited at the end of the last step, forming a circle.
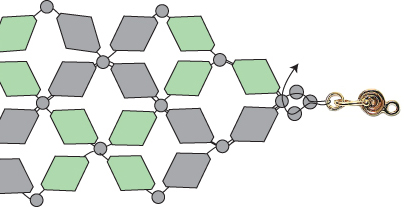


Go through these seed beads and the clasp several times to reinforce it. Weave back into the bracelet, knot in several places and cut your thread.

Thread your needle with the tail thread from step 1. Repeat step 17 to attach the other end of the clasp. If your bracelet seems a bit too short, just add more seed beads at both ends when attaching the clasp.

Friday, October 18, 2019

Free bead pattern: Astral Bracelet!


Astral Bracelet, free pattern

Astral Bracelet

2019 Deborah Roberti)

Originally created for the gorgeous new Czech 8x6mm Baroque oval two-hole cabochons, this design also works perfectly with 7mm Baroque round two-hole cabochons and 7mm round Czechmates two-hole cabochons. The stitch is very easy—basically a modified right-angle weave—and along with the two-hole cabochons, all you need are some size 11 seed beads and 3mm fire-polished beads.


MATERIALS
(for a 7 to 7.5-inch bracelet, not including the length of your clasp)
• 3 yards of 6 lb. FireLine
• About 300 size 11/0 Miyuki rocaille seed beads (Toho may be a bit too fat)
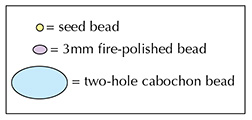
• About 28 size 3mm fire-polished beads
• About 12 two-hole cabochons (8x6mm Baroque oval cabochons, 7mm Baroque round cabochons or 7mm round Czechmates cabochons)
• clasp


Step 1: Thread your needle with about 3 yards of FireLine (or start with a length that you feel comfortable working with and add more as you need it).

Leaving about a 10-inch tail for attaching one end of your clasp, string a seed bead, a fire-polished bead and a seed bead. Go up through the right hole of a two-hole cabochon bead.

String a seed bead, a fire-polished bead and a seed bead. Go down through the left hole of the two-hole cabochon bead that you just added.

Tie the beads together using a tight double knot:


Step 2: Go back around through the seed bead, the fire-polished bead, the seed bead, the right hole of the two-hole cabochon bead, the seed bead, the fire-polished bead and the seed bead that you added in the last step:


Step 3: String six seed beads.

NOTE: If you are using Toho brand rocaille seed beads, which are a bit fatter than the Miyuki brand seed beads, you may only need five seed beads in this step and the next. If your rocaille seed beads, or your two-hole cabochon beads, are on the small size, you may need to add seven seed beads in this step and the next. Go with what fits best as you surround the cabochons with seed beads.

Go around (but NOT through) the left side of the two-hole cabochon bead and across through the seed bead, the fire-polished bead and the seed bead below the cabochon (highlighted in RED):


Step 4: String six more seed beads.

Go around (but NOT through) the right side of the two-hole cabochon bead and across through the seed bead and the fire-polished bead above the cabochon (highlighted in RED):


Step 5: Go back around through the seed beads and fire-polished beads that surround the two-hole cabochon (highlighted in RED):


Step 6: String two seed beads, a fire-polished bead and two more seed beads.

Go around and back across through the fire-polished bead that you just exited (highlighted in RED):


Step 7: Go back around through the beads that you just added (highlighted in RED):


Step 8: Go back around through the two seed beads, the fire-polished bead and the seed bead highlighted in RED:


Step 9: String a seed bead. Go across through the seed bead, the fire-polished bead and the seed bead highlighted in RED.

The seed bead that you just added should sit beside the two seed beads on the right so that the trio of seed beads form a nice point, or picot, as you pull tight:


Step 10: String another seed bead. Go across through the seed bead and fire-polished bead highlighted in RED.

The seed bead that you just added should sit beside the two seed beads on the left so that the trio of seed beads form a nice point, or picot, as you pull tight:


Step 11: To add the next two-hole cabochon, string a seed bead.

Go up through the right hole of a new two-hole cabochon bead.

String a seed bead, a fire-polished bead and a seed bead.

Go down through the left hole of the two-hole cabochon bead that you just added.

String another seed bead. Go across through the fire-polished bead that you exited at the end of the last step (highlighted in RED):


Step 12: Go back up and around through the seed bead, the right hole of the two-hole cabochon bead, the seed bead, the fire-polished bead and the seed bead that you added in the last step:


Step 13: String six seed beads.

NOTE: Again, if you are using Toho brand rocaille seed beads, which are a bit fatter than the Miyuki brand seed beads, you may only need five seed beads in this step and the next. If your rocaille seed beads, or your two-hole cabochon beads, are on the small size, you may need to add seven seed beads in this step and the next. Go with what fits best as you surround the cabochons with seed beads.

Go around (but NOT through) the left side of the two-hole cabochon bead and across through the seed bead, the fire-polished bead and the seed bead below the cabochon (highlighted in RED):


Step 14: String six more seed beads.

Go around (but NOT through) the right side of the two-hole cabochon bead and across through the seed bead and the fire-polished bead above the cabochon (highlighted in RED):


Step 15: Go back around through the seed beads and fire-polished beads that surround the two-hole cabochon (highlighted in RED):


Step 16: Repeat Step 6 to Step 15 until your bracelet is the length you want it, minus about a third-inch and the length of your clasp:


Step 17: To attach one end of your clasp, string a seed bead, a fire-polished bead and two seed beads.
Go through your clasp and back down through the last seed bead that you just added:


NOTE: If you want to make your bracelet longer, just add more beads in this step and the next. If you want to make it shorter, just use all seed beads instead of a mix of fire-polished and seed beads.

Step 18: String a seed bead, a fire-polished bead and a seed bead. Go back across through the fire-polished bead at the end of the bracelet (highlighted in RED):


Step 19: Go back around through the beads highlighted in  RED and your clasp several times:


Weave back into the bracelet, knot in several places and cut your thread.

Step 20: To attach the clasp to the other side of the bracelet, thread your needle with the tail from Step 1.

Go across through the seed bead and fire-polished bead highlighted in RED:


Repeat Step 17 to Step 19.


Astral Bracelet, free pattern

Wednesday, October 16, 2019

Guinevere Bracelet

Guinevere Bracelet, free crystal pattern


Guinevere Bracelet

2007, updated 2019 Deborah Roberti


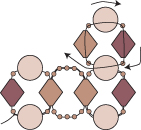
Fully illustrated with detailed step-by-step instructions, this right-angle weave tutorial is ideal for beginner beaders. Although I use bicone crystals and glass pearls, most any 4mm beads will work.


MATERIALS (for a 7-inch bracelet, not including clasp)
• About 5 yards of 6 lb. FireLine
• About 600 11/0 seed beads
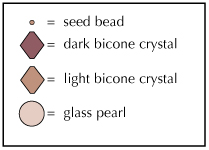
• About 48 dark 4mm bicone crystals
• About 46 light 4mm bicone crystals
• About 46 4mm glass pearls
• clasp


Step 1: You’re going to have to add thread while creating this bracelet so start with a length that you feel comfortable working with and add more as you need it.

String a seed bead, a dark crystal, a seed bead, a pearl, a seed bead, a light crystal, a seed bead and a pearl.

Leaving about a 12-inch tail for attaching one end of the clasp, tie these beads in a circle with a double knot:


Step 2: Go back through the pearl, the seed bead and the light crystal:


Step 3: String 5 seed beads, a light crystal and 5 seed beads. Go around and up through the light crystal that you exited at the end of the last step:


Step 4: Continue back through the 5 seed beads and down through the light crystal you strung in the last step:


Step 5: String a seed bead, a pearl, a seed bead, a dark crystal, a seed bead, a pearl and a seed bead. Go around and back down through the light crystal that you exited at the end of the last step:


Step 6: Continue back through the seed bead, the pearl, the seed bead, the dark crystal, the seed bead and the pearl you added in the last step:


You’ve just finished row 1.

Step 7: To start row 2, string a seed bead, a light crystal, a seed bead, a pearl, a seed bead, a dark crystal and a seed bead. Go around and back through the pearl that you exited at the end of the last step:


Step 8: Continue back up through the seed bead and the light crystal that you added in the last step:


Step 9: String 5 seed beads, a light crystal and a seed bead. Go around and through the middle 3 seed beads in row 1 (highlighted in RED):


Step 10: String a seed bead. Go up through the light crystal highlighted in RED:


Step 11: Go back through the 5 seed beads and the light crystal (all highlighted in RED) that you added in Step 9:


Step 12: String a seed bead. Go through the top-left pearl (highlighted in RED):


Step 13: String a seed bead, a dark crystal, a seed bead, a pearl and a seed bead. Go around and down through the light bicone crystal, the seed bead and the pearl that you exited at the end of the last step (all highlighted in RED):


Step 14: To finish row 2, continue back up through the seed bead, the dark crystal, the seed bead and the pearl:


Step 15: To start row 3, string a seed bead, a light crystal, a seed bead, a pearl, a seed bead, a dark crystal and a seed bead. Go around and back through the pearl that you exited at the end of the last step:


Step 16: Continue on up through the seed bead and the light crystal that you added in the last step:


Step 17: String 5 seed beads, a light crystal and a seed bead. Go around and through the middle 3 seed beads in row 2 (highlighted in RED):


Step 18: String a seed bead. Go up through the light crystal highlighted in RED:


Step 19: Continue back through the 5 seed beads and the light crystal (all highlighted below in RED):


Step 20: String a seed bead. Go through the top-right pearl in row 2 (highlighted in RED):


Step 21: String a seed bead, a dark crystal, a seed bead, a pearl and a seed bead. Go around and back down through the top-right light crystal, the seed bead and the pearl that you exited at the end of the last step (all highlighted in RED):


Step 22: To finish row 3, continue back up through the seed bead, the dark crystal, the seed bead and the pearl:


Repeat Steps 7-22 until your bracelet is the length you want it, minus about a half-inch and the length of your clasp.

Step 23: To attach one end of your clasp, string a seed bead, a dark crystal and two seed beads. Go through one end of the clasp and back through the last seed bead that you just strung:
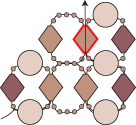


Step 24: String a seed bead, a dark crystal and a seed bead. Go through the top-left pearl (highlighted in RED):


Step 25: Now the name of the game is to weave your way back through the clasp two more times to reinforce it. You can do this absolutely anyway you wish but the RED line is a suggested path:


Weave your way back into the bracelet, knot in several places and then cut your thread.

Step 26: To attach the clasp to the other end of the bracelet, simply thread your needle with the tail from Step 1. Go through the top-right pearl:


Repeat Steps 23-25.


Guinevere Bracelet, free crystal pattern