Tuesday, September 13, 2022

Free bead pattern: Arcos par Puca Earrings!

Jolie Earrings, free at AroundTheBeadingTable.com


Jolie Earrings
(©2016 Deborah Roberti)
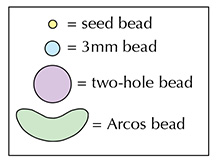
MATERIALS
• 4 feet of 6 lb. FireLine
• About 50 size 11/0 seed beads
• 12 size 3mm beads (any type size 3mm bead will work—Minos® beads, fire-polished beads, round beads, crystals, etc.)
• 4 Arcos® Par Puca® beads (referred to as Arcos beads within the Step text)
• 2 size 6mm two-hole beads (Czech two-hole Cabochon beads, Silky beads, Honeycomb beads and DiscDuo beads work great)
• two small (2-4mm) closed jump rings
• a pair of earring findings

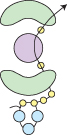
Step 1: Thread your needle with about 2 feet of FireLine.

Leaving about a 5-inch tail that you can weave in and make disappear at any time, string two seed beads and three 3mm beads.

Tie the beads in a circle with a tight double knot:

Step 2: Go back around through the beads that you strung in the first step, grab your tail thread and tie another tight knot:

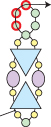
Step 3: Go back across through the two seed beads highlighted in RED:

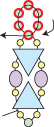
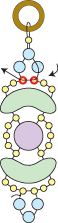
Step 4: String two seed beads.

Go up through the right hole of an Arcos bead:

NOTE: Although Arcos beads have three holes, you’ll only be using the two outside holes for this design. Just ignore the middle hole.

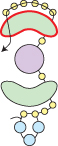
Step 5: String a seed bead and go up through the right hole of a two-hole bead.

String another seed bead and go up through the right hole of a new Arcos bead:

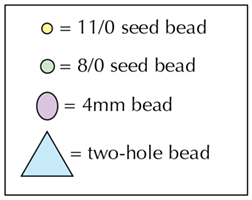
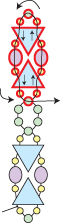
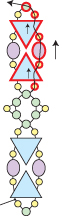
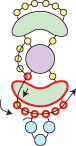
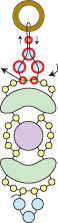
Step 6: String six seed beads.

Go around the top of the Arcos bead that you just exited (highlighted in RED) and then down through the left hole of this same Arcos bead:

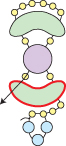
Step 7: String a seed bead.

Go down through the left hole of the two-hole bead highlighted in RED:

Step 8: String a seed bead.

Go down through the left hole of the Arcos bead highlighted in RED:

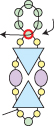
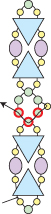
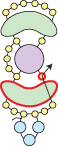
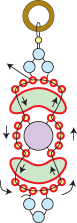
Step 9: String two seed beads.

Go across through the four seed beads highlighted in RED:

Step 10: Go back up through the right hole of the bottom Arcos bead, the seed bead above, the right hole of the two-hole bead, the seed bead above and the right hole of the top Arcos bead highlighted in RED:

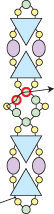
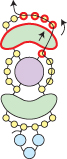
Step 11: Go back around through the six seed beads, the left hole of the Arcos bead and the seed bead highlighted in RED:

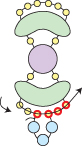
Step 12: String three seed beads.

Go around the two-hole bead and then down through the seed bead, the left hole of the Arcos bead and the six seed beads highlighted in RED:

NOTE: Unfortunately, not all size 11/0 seed beads are actually the same size. If three seed beads doesn’t seem like enough to wrap around the two-hole bead in Step 12 and 14, just add four seed beads instead.

Step 13: Go up through the right hole of the Arcos bead and the seed bead highlighted in RED:

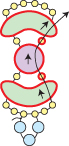
Step 14: String three seed beads.

Go around the two-hole bead and then up through the seed bead, the right hole of the Arcos bead and the four seed beads highlighted in RED:

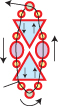
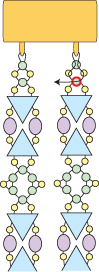
Step 15: String two 3mm beads and a seed bead.

Go around through your jump ring and then back down through the seed bead and the second 3mm bead that you just strung:

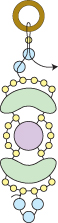
Step 16: String another 3mm bead.

Go across through the two seed beads highlighted in RED:

Step 17: Go back around through the beads highlighted in RED and the jump ring:

Step 18: Go back around through the beads highlighted in RED:

Step 19: Go back around through the beads highlighted in RED and the jump ring:

Jolie Earrings, free pattern from Deb Roberti

Weave back into your earring, knot and cut your thread. Attach your earring finding to the jump ring.


Tuesday, September 6, 2022

Free bead pattern: Reflection Bands

Reflection Bands, free bead pattern

Reflection Bands

Another two-hole bead stash-buster pattern! Use size 11/0 and 8/0 seed beads, 4mm beads (can be round, fire-polished or bicone crystal) and your choice of two-hole beads—Kheops par Puca beads, Super Kheops par Puca beads, Ginko beads, Helios par Puca beads, PieDuo beads or others I have yet to try!

Reflection Bands, free bead pattern

MATERIALS
(for a 7.25-inch band, not including clasp)

• About 2 yards of 6 lb. FireLine
• About 100 size 11/0 seed beads
• About 45 size 8/0 seed beads
• About 14-16 size 4mm beads (can be round, fire-polished or bicone crystal)
• About 14-16 two-hole beads (For the illustrations, I used Kheops par Puca beads but you can also Super Kheops par Puca beads, Ginko beads, PieDuo bead, Helios par Puca beads or others I have yet to try!)
• clasp

Step 1: Thread your needle with a length of FireLine that you feel comfortable working with and add more as you need it.

Leaving about a 10-inch tail for attaching the clasp, string an 11/0 seed bead, an 8/0 seed bead and an 11/0 seed bead. Go up the right hole of a two-hole bead. String an 11/0 seed bead, a 4mm bead and an 11/0 seed bead:

NOTE: You will not be making a knot until Step 3 so keep the tension tight and hold onto this tail thread for now.

Step 2: Go up through the right hole of another two-hole bead but make sure it is positioned as a reflection of the two-hole bead below (i.e. pointy side down).

String an 11/0 seed bead, an 8/0 seed bead and an 11/0 seed bead. Go around and down through the left hole of this same two-hole bead that you just added:

Step 3: String an 11/0 seed bead, a 4mm bead and an 11/0 seed bead. Go down through the left hole of the bottom two-hole bead (highlighted in RED). Grab your tail thread and tie a tight double knot:

Step 4: Go back around through the beads highlighted in RED to exit from the top 8/0 seed bead:

Step 5: Go back around through the beads highlighted in RED again and exit from the top 8/0
seed bead:

You have just finished the first Reflection motif.

Step 6: String five 8/0 seed beads. Go around and back across through the 8/0 seed bead that you just exited (highlighted in RED), creating a circle of 8/0 seed beads:

Step 7: Go back around through the 8/0 seed beads that you just added (highlighted in RED):

Step 8: Go back up through the three 8/0 seed beads on the circle (highlighted in RED):

Step 9: To start the next motif, go up through the right hole of a new two-hole bead. String an 11/0 seed bead, a 4mm bead and an 11/0 seed bead.

Go up through the right hole of another new two-hole bead but make sure it is positioned as a reflection of the two-hole bead below (i.e. pointy side down):

Step 10: String an 11/0 seed bead, an 8/0 seed bead and an 11/0 seed bead. Go around and down through the left hole of this same two-hole bead that you just exited (highlighted in RED):

Step 11: String an 11/0 seed bead, a 4mm bead and an 11/0 seed bead. Go down through the left hole of the bottom two hole bead in this new motif (highlighted in RED):

Step 12: String an 11/0 seed bead. Go across through the 8/0 seed bead below (highlighted in RED):

Step 13: Go back around through the beads highlighted in RED:

You have just finished the next Reflection motif.

Step 14: Go down through the 8/0 seed bead on the circle below (highlighted in RED):

Step 15: String an 11/0 seed bead. Go around through the 8/0 seed beads highlighted in RED:

The 11/0 seed bead that you just added should sit beside and a little between the two adjacent 8/0 seed beads so that the trio of seed beads form a bit of a point as you pull tight.

Step 16: String an 11/0 seed bead. Go back up through the two 8/0 seed beads highlighted in RED:

Again, the 11/0 seed bead that you just added should sit beside and a little between the two adjacent 8/0 seed beads so that the trio of seed beads form a bit of a point as you pull tight.

Step 17: Go back up through the beads highlighted in RED to exit from the top 8/0 seed bead:

You have just finished the second Reflection motif. To complete the band, you will repeat Steps 6 to 17 to add more motifs, joined by 8/0 and 11/0 seed bead circles.

Step 18: Repeat Step 6 to Step 17 until your band is the length you want it, minus about a quarter-inch and the length of your clasp:

Step 19: To attach one end of the clasp, string an 11/0 seed bead and an 8/0 seed bead. Go through your clasp and then back through the 8/0 seed bead that you just strung:

NOTE: To make your bracelet longer, just add more 11/0 seed beads than directed in this step and the next.

Step 20: String an 11/0 seed bead. Go across through the 8/0 seed bead that you exited earlier (highlighted in RED):

Step 21: Go back around through the seed beads highlighted in RED and the clasp several times:

Weave back into the band, knot in several places and then cut your thread.

Step 22: To attach the clasp to the other end of your bracelet, thread your needle with the tail thread from Step 1. Go up through the two seed beads highlighted in RED:

Repeat Steps 19-21.

Creating a multi-strand bracelet

MATERIALS
(for a 7.25-inch band, not including clasp)
• About 4 yards of 6 lb. FireLine
• About 200 size 11/0 seed beads
• About 90 size 8/0 seed beads
• About 28-32 size 4mm beads (can be round, fire-polished or bicone crystal)
• About 28-32 two-hole beads (For the illustrations, I used Kheops par Puca beads but you can also Super Kheops par Puca beads, Ginko beads, PieDuo bead, Helios par Puca beads or others I have yet to try.)
•Beadsmith Cymbal Axos II Delica magnetic clasp (or any multi-strand clasp)

Reflection Bands, free bead pattern

Repeat Step 1 to Step 22 twice to create two bands but when it comes time to attach each band to your clasp in Steps 19 to 22, attach the band ends to a multi-strand clasp loop instead.

I used a double-strand Beadsmith Cymbal Axos II Delica magnetic clasp for my sample but you can use any clasp you wish, for as many band strands as you prefer as long as the multi-strand clasp loops have enough distance between them.