Sunday, December 14, 2014

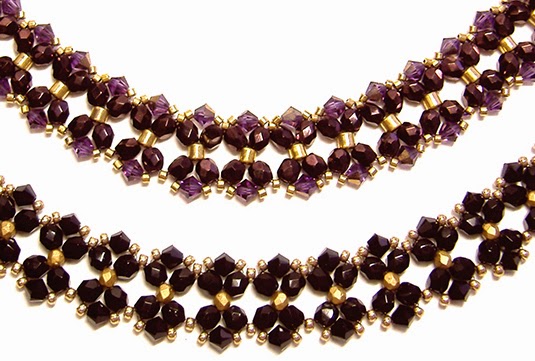
Craving Crystal Necklace


Craving Crystal Necklace

The Craving Crystal Necklace pattern is fully illustrated with detailed step-by-step instructions. I used bicone crystals and round beads because I liked the way they looked together but you can use any bead type and shape you wish as long as the beads are 4mm in size. Click on a picture for more details at AroundTheBeadingTable.com.

It matches the Craving Crystal pattern uploaded earlier that includes directions for four bands and two pair of earrings:

Craving Crystal bands and earrings

Thursday, December 4, 2014

FREE SuperDuo pattern: Starlight!

The Starlight pattern can be used to make a pendant or ornament. It’s a great stash-buster!

Downloadable PDF at the bottom of the page HERE:
http://www.aroundthebeadingtable.com/Tutorials/Starlight.html


Wednesday, November 19, 2014

Crystal bead pattern now FREE!

Hana-Ami Bracelets pattern

The Hana-Ami Bracelets pattern is the very first tutorial that I ever wrote—over ten years ago! Since then, I have used this Japanese Hana-Ami motif in a number of patterns, and the triangle weave stitch technique still remains one of my personal favorites.

Free step-by-step instructions and downloadable PDF at the bottom of the page HERE: http://www.aroundthebeadingtable.com/Tutorials/HanaAmiBracelets.html

Thursday, November 13, 2014

new SuperDuo pattern for sale: Maya Bands


Maya Bands


The Maya Bands pattern is fully illustrated with detailed step-by-step instructions for making three fun SuperDuo bands.

Here are some more pictures:

Maya Bands
Maya Bands
Maya Bands

Monday, November 3, 2014

new pattern for sale: Cosmos Necklace and Earrings


Cosmos Necklace and Earrings

Use SuperDuos, SuperUnos, size 11/0 seed beads, any type 4mm beads and 6-9mm accent beads (for the center drop) to create this necklace and matching earrings. This pattern is fully illustrated with detailed step-by-step instructions and matches the Cosmos Bracelet and Earrings pattern released earlier.

Instructions are also incuded for attaching the center beaded motif to a chain rather than creating a beaded chain:

Cosmos Necklace

Payable through Paypal or major credit card for instant PDF download.
Also available for sale via credit card without Paypal at Bead-Patterns.com:
 
Cosmos Necklace

Friday, October 17, 2014

now free! Bow Tie crystal bracelet pattern


free Bow Tie Bracelet pattern

Bow Tie Bracelet
©2005 Deborah Roberti
 
 
MATERIALS (for a 7-inch bracelet, not including clasp)
• 3 yards waxed Nymo or C-Lon thread, size D, or 6 lb. FireLine
• About 125 size 11/0 seed beads or Delica beads
• About 17 size 3mm beads (of any type, or size 8/0 seed beads or size 8/0 Delica beads)
• About 72 size 4mm fire-polished beads
• About 34 size 4mm bicone crystals
• clasp


Step 1: Thread your needle with 3 yards Nymo, C-Lon or Fireline.

String a seed bead, a fire-polished bead, a seed bead, a fire-polished bead, a 3mm bead, a fire-polished bead, a seed bead and a fire-polished bead.

Leaving about a 10-inch tail for attaching the clasp, tie the beads in a circle with a double knot:


Step 2: Go back around through the fire-polished bead, the seed bead, the fire-polished bead, the 3mm bead and the fire-polished bead that you strung in the last step:


Step 3: String a seed bead, a bicone crystal, a seed bead and a fire-polished bead.

Go back down through the 3mm bead highlighted in RED:


Step 4: Continue on down through the fire-polished bead highlighted in RED:


Step 5: String a seed bead, a bicone crystal, a seed bead and a fire-polished bead.

Go up through the 3mm bead and out through the fire-polished bead highlighted in RED:


Step 6: String a seed bead, a fire-polished bead, a 3mm bead, a fire-polished bead and a seed bead.

Go around and up through the fire-polished bead, the 3mm bead and the fire-polished bead highlighted in RED:


Step 7: Go back down through the seed bead, the fire-polished bead, the 3mm bead and the fire-polished bead that you strung in the last step (highlighted in RED):


Step 8: String a seed bead, a bicone crystal, a seed bead and a fire-polished bead.

Go up through the 3mm bead highlighted in RED:


Step 9: Continue on up through the fire-polished bead highlighted in RED:


Step 10: String a seed bead, a bicone crystal, a seed bead and a fire-polished bead.

Go down through the 3mm bead and out through the fire-polished bead highlighted in RED:


Step 11: String a seed bead, a fire-polished bead, a 3mm bead, a fire-polished bead and a seed bead.

Go around and down through the fire-polished bead, the 3mm bead and the fire-polished bead highlighted in RED:


Step 12: Go back up through the seed bead, the fire-polished bead, the 3mm bead and the fire-polished bead that you strung in the last step (highlighted in RED):


Step 13: String a seed bead, a bicone crystal, a seed bead and a fire-polished bead.

Go down through the 3mm bead highlighted in RED:


Step 14: Continue on down through the fire-polished bead highlighted in RED:


Step 15: String a seed bead, a bicone crystal, a seed bead and a fire-polished bead.

Go up through the 3mm bead and out through the fire-polished bead highlighted in RED:


Step 16: Repeat steps 6 to 15 until your bracelet is the length you want it, minus about a half-inch and the length of your clasp.

Step 17: To close off the end of the bracelet, string a seed bead, a fire-polished bead, a seed bead, a fire-polished bead and a seed bead.

Go around and up through the fire-polished bead, the 3mm bead and the fire-polished bead highlighted in RED:


Step 18: Continue back around through the seed bead, the fire-polished bead and the seed bead that you strung in the last step (highlighted in RED):


Step 19: To attach the clasp, string four size 11 seed beads, go through your clasp and back through the last seed bead that you just strung (the 4th seed bead).

String 3 more seed beads and go back down through the seed bead that you exited at the end of the last step (highlighted in RED).


Go through these seed beads and the clasp several more times to reinforce your attachment to the clasp. Weave back into the bracelet, knot in several places and cut your thread.

Repeat Step 19 to attach the other end of the clasp. If your bracelet seems a bit too short, just add more seed beads at the end when attaching the clasp.

Tuesday, September 30, 2014

Cube Bracelet pattern facelift

Was playing with the gorgeous Toho hybrid 4mm cube beads this summer and discovered that because the Toho cube holes are so much bigger than the Miyuki cube bead holes, they just swallow up the size 11 seed beads in my Cube Bracelet pattern

So... I used size 8 seed beads and 6mm instead of 4mm fire-polished beads and the result was a heavier, more substantial band so I added the variation to my pattern. 


http://www.aroundthebeadingtable.com/Patterns/CubeBracelet.html


Details and beads used here: http://www.aroundthebeadingtable.com/Patterns/CubeBracelet.html

Betsy at RedPandaBeads.com has the Toho hybrid cubes listed if you want to look at all the pretty colors: http://www.redpandabeads.com/category_s/2688.htm. I love them!

Thursday, September 18, 2014

New SuperDuo pattern: Cosmos Bracelet and Earrings

Use SuperDuo, SuperUno and size 11/0 seed beads to create this bracelet and matching earrings. Click on a picture for more details at AroundTheBeadingTable.com.

Cosmos Bracelet and Earrings

Go to the RedPandaBeads.com Gallery of Color Suggestions to see a list of the actual beads used.

Here are some more pictures:

Cosmos Bracelet and Earrings

Cosmos Bracelet and Earrings

Cosmos Bracelet and Earrings

Cosmos Bracelet and Earrings

Wednesday, September 17, 2014

Now Free: the Diagonal Stripes Bracelet

Diagonal Stripes Bracelet, free pattern

DIAGONAL STRIPES BRACELET
copyright 2006 Deborah Roberti


The Diagonal Stripes Bracelet pattern is fully illustrated with detailed step-by-step instructions for an easy, single-needle, right-angle weave (worked diagonally) band. I used 6mm bicone crystals but you could just as easily use 6mm fire-polished beads or any 6mm bead. For a smaller, daintier bracelet or necklace, use 4mm bicone crystals and 3mm fire-polished beads. It's a very versatile pattern.


MATERIALS (for a 7-inch bracelet, not including clasp)
• 3 yards Waxed Nymo or C-Lon thread, size D, or 6 lb. FireLine
• About 200 size 11/0 seed beads
• About 15 size 6mm blue bicone crystals
• About 15 size 6mm green bicone crystals
• About 15 size 6mm purple bicone crystals
• About 40 size 4mm black fire-polished beads
• clasp


Step 1: Thread your needle with 3 yards Nymo, C-Lon or Fireline. 

String a blue crystal, a seed bead, a fire-polished bead, a seed bead, a blue crystal, a seed bead, a fire-polished bead and a seed bead.

Leaving an 14- to 16-inch tail for attaching the clasp, tie the beads in a circle with a double knot:


Step 2: Go back around through the blue crystal, the seed bead, the fire-polished bead, the seed bead and the blue crystal that you added in the last step (highlighted in RED):


Step 3: String a seed bead, a fire-polished bead, a seed bead, a blue crystal, a seed bead, a fire-polished bead and a seed bead. Go around and back across through the blue crystal that you exited at the end of the last step (highlighted in RED):


Step 4: Go back around through the seed bead, the fire-polished bead, the seed bead, the blue crystal, the seed bead and the fire-polished bead that you added in the last step (highlighted in RED):


Step 5: String a seed bead, a green crystal, a seed bead, a fire-polished bead, a seed bead, a green crystal and a seed bead. Go around and back up though the fire-polished bead that you exited at the end the last step (highlighted in RED):


Step 6: Go back around through the seed bead, the green crystal, the seed bead, the fire-polished bead, the seed bead and the green crystal that you added in the last step (highlighted in RED):


Step 7: String a seed bead, a fire-polished bead, a seed bead, a green crystal, a seed bead, a fire-polished bead and a seed bead. Go around and back across through the green crystal that you exited at the end of the last step (highlighted in RED):


Step 8: Go back around through the beads highlighted in RED:


Step 9: String a seed bead, a purple crystal, a seed bead, a fire-polished bead, a seed bead, a purple crystal and a seed bead. Go around and up through the fire-polished bead that you exited at the end of the last step (highlighted in RED):


Step 10: Go back around through the beads highlighted in RED:


Step 11: String a seed bead, a fire-polished bead, a seed bead, a purple crystal, a seed bead, a fire-polished bead and a seed bead. Go around and back across through the purple crystal that you exited at the end of the last step (highlighted in RED):


Step 12: Go back around through the seed bead, the fire-polished bead, the seed bead, the purple crystal, the seed bead and the fire-polished bead that you added in the last step (highlighted in RED):


Step 13: Repeat Steps 9 through 12—alternating between blue, green and purple crystals—until your bracelet is the length you want it, minus about an inch and the length of your clasp.

Step 14: To attach the clasp to one end of your bracelet, string a seed bead, a crystal (whatever color is next in your alternation), a seed bead, a fire-polished bead, a seed bead, another crystal and a seed bead. Go around and back up through the fire-polished bead that you exited at the beginning of this step (highlighted in RED):


Step 15: Go back around through the seed bead, the crystal, the seed bead, the fire-polished bead and the seed bead highlighted in RED:


Step 16: String four seed beads. Go through the clasp and then back through the 4th seed bead that you just strung:


Step 17: String three more seed beads. Go back through the seed bead that you exited at the end of the last step (highlighted in RED), forming a circle of seed beads:


Step 18: To reinforce the area that connects to the clasp, go back around through the crystal, the seed bead, the fire-polished bead, the seed bead, the crystal, the seed bead, the fire-polished bead and exit out of the same seed bead you exited from at the beginning of this step (all beads highlighted in RED):


Step 19: Go back around through the circle of seed beads (highlighted in RED) and the clasp:


If you think you can get your needle and thread through this circle of seed beads and the clasp again, repeat this step.

Weave your way back into the bracelet, knot in several places and cut the thread.

Step 20: Flip the bracelet around so you can attach the other end of the clasp. Thread your needle with the tail thread from Step 1. Go through the seed bead and exit out of the fire-polished bead highlighted in RED:


Repeat Steps 14-19 to attach the other end of the clasp.