

Heart Necklace
(©2009, updated 2024 Deborah Roberti)

Fully illustrated and detailed step-by-step instructions for a crystal heart necklace that includes directions for connecting the beaded heart motif to chain or you can create your own beaded chain.
MATERIALS
For the heart with a beaded chain:
• 4 yards 6 lb. FireLine
• About 300 size 11/0 seed beads
• 33 size 4mm beads (can be round beads or pearls, bicone beads or fire-polished beads)
• 30 size 4mm fire-polished beads
• clasp
For the heart with a metal chain:
• About 5 feet of 6 lb. FireLine
• About 65 size 11/0 seed beads
• 25 size 4mm beads (can be round beads or pearls, bicone beads or fire-polished beads)
• 14 size 4mm fire-polished beads
• two 4-6mm open jump rings
• two 8- or 9-inch lengths of chain with clasp
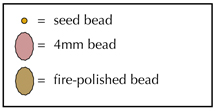
Step 1: Thread your needle with a length of FireLine that you feel comfortable working with and add more as you need it.
String a 4mm bead, a seed bead, a 4mm bead, a seed bead, a fire-polished bead, a seed bead, a fire-polished bead and a seed bead.
Leaving a 6- to 8-inch tail that you can weave in and cut later, tie the beads in a circle with a double knot:

Note, you are starting at the very bottom of the heart.
Step 2: Go back through the 4mm bead and the seed bead:

Step 3: String 5 seed beads. Go around and back across through the seed bead that you exited at the end of the last step, forming a circle of six seed beads:

Step 4: Go through the next seed bead on this circle of six seed beads:

Step 5: String a 4mm bead, a seed bead, a fire-polished bead and a seed bead. Go around and back up through the 4mm bead that you strung in Step 1, and then through the seed bead on the circle of six seed beads that you exited at the end of the last step (both beads highlighted in RED):
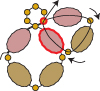
Step 6: Go through the next seed bead on the circle of six seed beads:
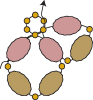
Step 7: String a 4mm bead, a seed bead, a 4mm bead and a seed bead. Go around and back across through the 4mm bead that you added in Step 5, and then through the seed bead on the circle of six seed beads that you exited at the end of the last step (both beads highlighted in RED):
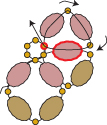
Step 8: Go through the next seed bead on the circle of six seed beads:
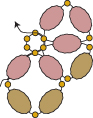
Step 9: String a 4mm bead, a seed bead, a 4mm bead and a seed bead. Go around and back down through the 4mm bead that you added in Step 7, and then through the seed bead on the circle of six seed beads that you exited at the end of the last step (both beads highlighted in RED):
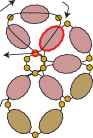
Step 10: Go through the next seed bead on the circle of six seed beads:
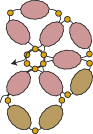
Step 11: String a 4mm bead, a seed bead, a 4mm bead and a seed bead. Go around and back down through the 4mm bead that you added in Step 9, and then through the seed bead on the circle of six seed beads that you exited at the end of the last step (both beads highlighted in RED):
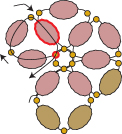
Step 12: Go through the next seed bead on the circle of six seed beads and the 4mm bead at about 7 o'clock (both beads highlighted in RED):
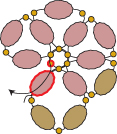
Step 13: String a seed bead, a fire-polished bead and a seed bead. Go back across through the 4mm bead at about 9 o’clock, through the seed bead on the circle of six seed beads, through the 4mm bead at about 11 o’clock and out of the seed bead (all beads highlighted in RED):
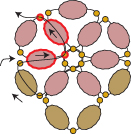
Step 14: String 4 seed beads. Go around and back through the two seed beads highlighted in RED, forming a second circle of six seed beads:
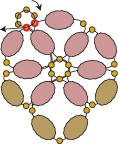
Step 15: Go through the next seed bead on this second circle of six seed beads:
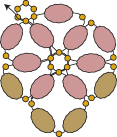
Step 16: String a 4mm bead, a seed bead, a fire-polished bead and a seed bead. Go around and back up through the 4mm bead, through the seed bead on the second circle of six seed beads that you exited at the end of the last step and then through the next seed bead on the second circle of six seed beads (all beads highlighted in RED):
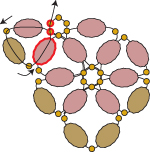
Step 17: String a 4mm bead, a seed bead, a 4mm bead and a seed bead. Go around and back across through the 4mm bead that you added in the last step, through the seed bead on the second circle of six seed beads that you exited at the end of the last step and then through the next seed bead on the second circle of six seed beads (all beads highlighted in RED):
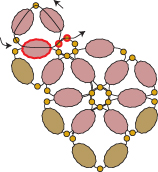
Step 18: String a 4mm bead, a seed bead, a 4mm bead and a seed bead. Go around and back down through the 4mm bead that you added in the last step and through the seed bead on the second circle of six seed beads that you exited at the end of the last step (both beads highlighted in RED):
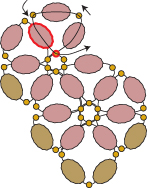
Step 19: Go through the next seed bead on the second circle of six seed beads and the 4mm bead (both beads highlighted in RED):
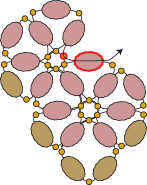
Step 20: String a seed bead, 4mm bead and a seed bead. Go back down through the 4mm bead and the seed bead on the second circle of six seed beads, and then across through the 4mm bead that you exited at the end of the last step (all beads highlighted in RED):
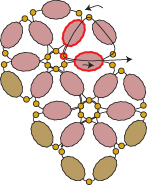
Step 21: Go through the two seed beads highlighted in RED:
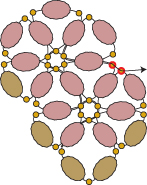
Step 22: String 3 seed beads. Go around and back through the three seed beads highlighted in RED, forming a third circle of six seed beads:
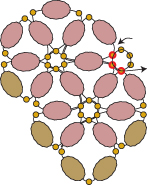
Step 23: Go through the next seed bead on this third circle of six seed beads:
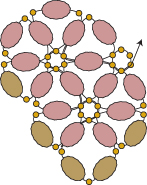
Step 24: String a 4mm bead, a seed bead, a fire-polished bead and a seed bead. Go around and back up through the 4mm bead, through the seed bead on the third circle of six seed beads that you exited at the end of the last step and then through the next seed bead on the third circle of six seed beads (all beads highlighted in RED):
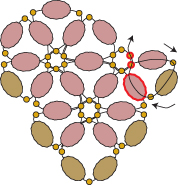
Step 25: String a 4mm bead, a seed bead, a 4mm bead and a seed bead. Go around and back across through the 4mm bead that you added in the last step and through the seed bead on the third circle of six seed beads that you exited at the end of the last step (all beads highlighted in RED):
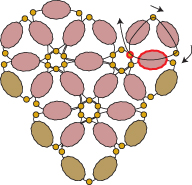
Step 26: Go through the next seed bead on the third circle of six seed beads and the 4mm bead (both beads highlighted in RED):
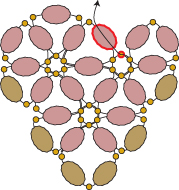
Step 27: String a seed bead, 4mm bead and a seed bead. Go back down through the 4mm bead, the seed bead on the third circle of six seed beads and up through the 4mm bead (all beads highlighted in RED):
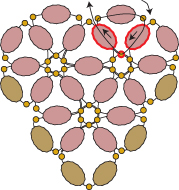
Step 28: Go back through the seed bead, the 4mm bead and the seed bead that you added in the last step, and then through the top right-most seed bead(all beads highlighted in RED):
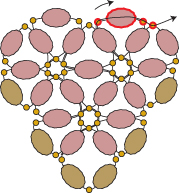
Step 29: String 4 seed beads. Go around and back through the two seed beads highlighted in RED, forming a fourth circle of six seed beads:
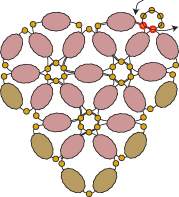
Step 30: Go through the next seed bead on this fourth circle of six seed beads:
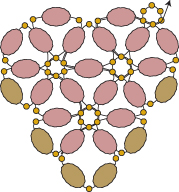
Step 31: String a 4mm bead, a seed bead, a fire-polished bead and a seed bead. Go around and back up through the 4mm bead, through the seed bead on the fourth circle of six seed beads that you exited at the end of the last step and then through the next seed bead on the fourth circle of six seed beads (all beads highlighted in RED):
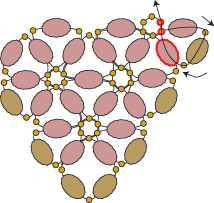
Step 32: String a 4mm bead, a seed bead, a fire-polished bead and a seed bead. Go around and back across through the 4mm bead and through the seed bead on the fourth circle of six seed beads that you exited at the end of the last step (both beads highlighted in RED):
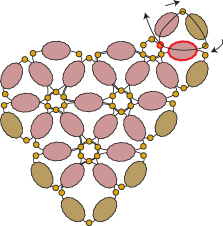
For extra reinforcement, go back around through the 4mm bead, the seed bead, the fire-polished bead, the seed bead, the 4mm bead and the seed bead on the fourth circle of six seed beads (all beads highlighted in RED):
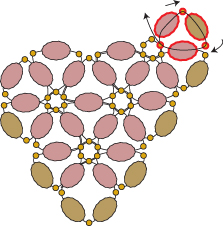
Step 33: Go through the next seed bead on the fourth circle of six seed beads that you exited at the end of the last step (highlighted in RED):
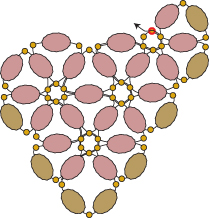
Step 34: String a 4mm bead, a seed bead, a fire-polished bead and a seed bead. Go around and back down through the 4mm bead that you added in the last step and through the seed bead on the fourth circle of six seed beads that you exited at the end of the last step (all beads highlighted in RED):
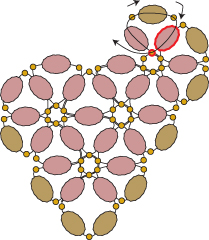
Step 35: Go through the next seed bead on the fourth circle of six seed beads and the 4mm bead (both beads highlighted in RED):
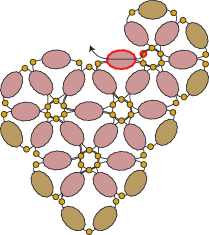
Step 36: String a seed bead, fire-polished bead and a seed bead. Go back down through the 4mm bead, the seed bead on the fourth circle of six seed beads and across through the 4mm bead that you exited at the end of the last step (all beads highlighted in RED):
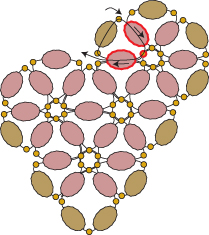
Step 37: Go across through the three seed beads, the 4mm bead and the two seed beads highlighted in RED:
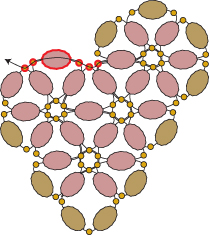
Step 38: String 4 seed beads. Go around and back through the two seed beads highlighted in RED, forming a fifth circle of six seed beads:
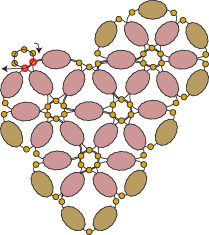
Step 39: Go through the next seed bead on this fifth circle of six seed beads:
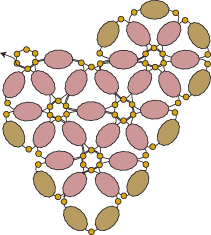
Step 40: String a 4mm bead, a seed bead, a fire-polished bead and a seed bead. Go around and back up through the 4mm bead, through the seed bead on the fifth circle of six seed beads that you exited at the end of the last step and then through the next seed bead on the fifth circle of six seed beads (all beads highlighted in RED):
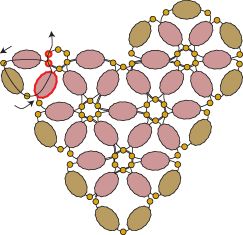
Step 41: String a 4mm bead, a seed bead, a fire-polished bead and a seed bead. Go around and back across through the 4mm bead and through the seed bead on the fifth circle of six seed beads that you exited at the end of the last step (both beads highlighted in RED):
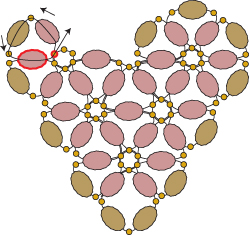
For extra reinforcement, go back around through the 4mm bead, the seed bead, the fire-polished bead, the seed bead, the 4mm bead and the seed bead on the fourth circle of six seed beads (all beads highlighted in RED):
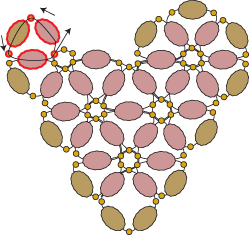
Step 42: Go through the next seed bead on the fifth circle of six seed beads that you exited at the end of the last step (highlighted in RED):
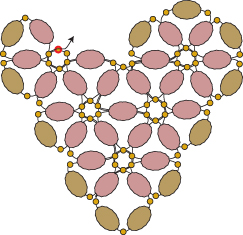
Step 43: String a 4mm bead, a seed bead, a fire-polished bead and a seed bead. Go around and back down through the 4mm bead that you added in the last step and through the seed bead on the fifth circle of six seed beads that you exited at the end of the last step (all beads highlighted in RED):
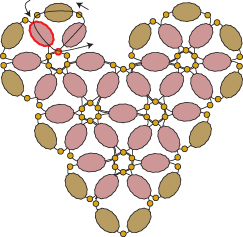
Step 44: Go through the next seed bead on the fifth circle of six seed beads and the 4mm bead (both beads highlighted in RED):
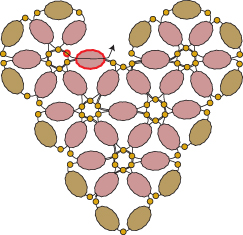
Step 45: String a seed bead, fire-polished bead and a seed bead. Go back down through the 4mm bead, the seed bead on the fifth circle of six seed beads and across through the 4mm bead (all beads highlighted in RED):
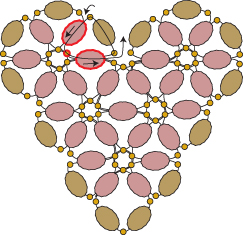
Step 46: Go back through the seed bead that you added in the last step (highlighted in RED):
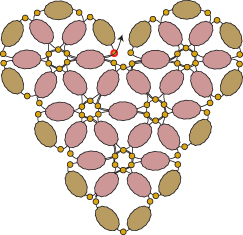
Step 47: String a seed bead. Go back around through the seed beads highlighted in RED to form a circle of seed beads:
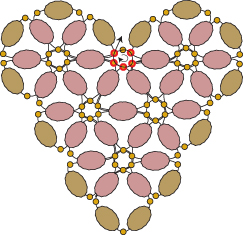
Step 48: Go back around through the outer edge of fire-polished beads and seed beads highlighted in RED:
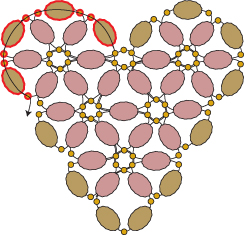
Step 49: To fill in the gap, string one or two seed beads (depending on how large your gap is) and go down through the seed bead, the fire-polished bead and the seed bead highlighted in RED:
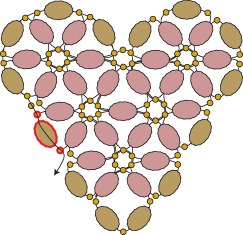
Step 50: To fill in the next gap, string one or two seed beads and go around through the beads highlighted in RED but skip the bottom seed bead so that it pops out as you pull tight, creating a more of a point:
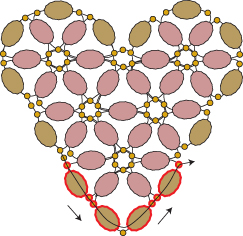
Step 51: To fill in the gap, string one or two seed beads and go up through the seed bead, the fire-polished bead and the seed bead highlighted in RED:
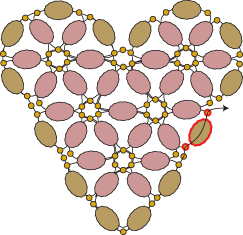
Step 52: To fill in the next gap, string one or two seed beads and go around through the seed beads and fire-polished beads highlighted in RED:
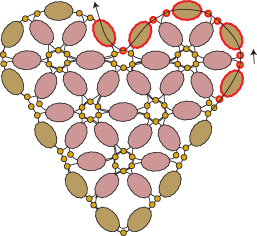
Step 53: Go back around through the outer edge of beads highlighted in RED, skipping the bottom seed bead:
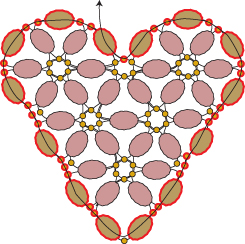
If you are making the version that will be attached to chain, weave your way back into the pendant, knot and cut your thread.
If you are making the version with a beaded chain, skip to step 57.
Step 54: To create the version that attaches to a chain, open a jump ring and position it between the top left fire-polished bead and the seed bead to the right of this fire-polished bead:
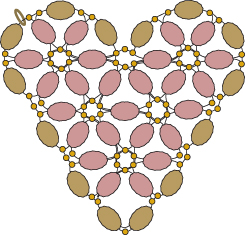
Note, the best way to open a jump ring is to grasp each side of the ring with a pair of pliers—one pair of pliers in each hand so that the jump ring split is in the middle. You can use chain-nosed, round-nosed, etc.—whatever pliers you prefer or have available. Next, simultaneously push the left side of the jump ring away from you while you pull the right side toward you.
Step 55: Once the jump ring is positioned between the fire-polished bead and the seed bead, slip it through the end link of your length of chain, and then close your jump ring by simultaneously pulling the left side of the jump ring toward you while you push the right side away from you so that the two ends of the jump ring come back together.
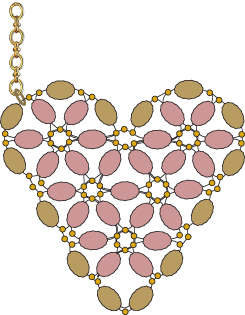
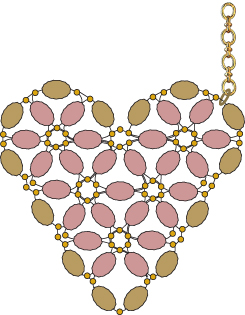
Step 56: Repeat Steps 54-55 for the right side of your pendant:
Step 57: To create the version with the beaded chain, weave around through the beads highlighted in RED:
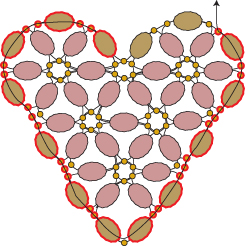
String 20 seed beads, a fire-polished bead, a seed bead, a 4mm bead, a seed bead and a fire-polished bead. Repeat three more times and then string 30 seed beads.
NOTE: I used the number of seed beads and 4mm beads listed above to create (approximately) an 8.5-inch beaded chain for the right side. You can, of course, vary this amount to get the length that you want.
Go through one end of your clasp and then back down through the beads that you just strung.
Go back across through the beads along the top of the heart (highlighted in RED):

Step 58: Repeat Step 57 to add a beaded chain to the left side but exit from the seed bead highlighted in RED:

Step 59: Go back around through the outer edge of beads on the heart highlighted in RED:

Go back through the beads in the beaded chain that you added in Steps 57 and 58 and the clasp to add some strength to your beaded chain.
Weave your way back into the heart, knot and cut your thread. Thread your needle with the tail from Step 1, weave your way into the heart, knot and cut your thread.
