Monday, January 15, 2018

Free Cali bead pattern: Hilltop Band


Free Cali bead pattern: Hilltop Band

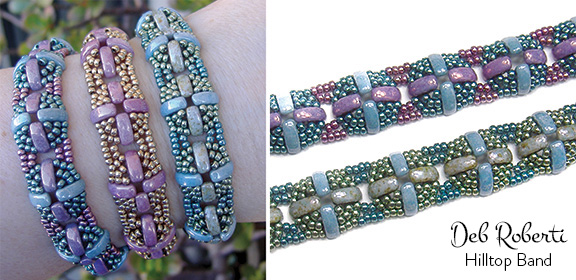
Hilltop Band
©2017 Deborah Roberti

My love for the new Cali beads continues. All you need are Cali beads and 11/0 seed beads to make this simple band that has got a bit of dimension to it. Although you can make it flat by adding more seed beads or some bigger beads, I love the hilltops.

MATERIALS
(for a 7-inch bracelet, not including clasp)
• 4 yards of 6 lb. FireLine
• About 400 size 11/0 Color1 seed beads
• About 120 size 11/0 Color2 seed beads
• About 20 Color1 Cali beads*
• About 20 Color2 Cali beads*
• clasp
*Cali beads are new Czech 3x8mm marquise-shaped beads with three holes!
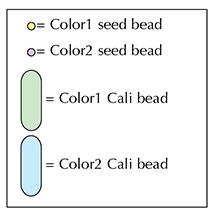

Step 1: Thread your needle with about 4 yards of FireLine (or start with a length that you feel comfortable working with and add more later).

Leaving about a 10-inch tail for attaching a clasp, string a Color2 Cali bead, a Color1 seed bead, a Color1 Cali bead, a Color1 seed bead, a Color2 Cali bead, Color1 seed bead, a Color1 Cali bead and Color1 seed bead.

Tie the beads together in a circle with a tight double knot:
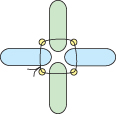

Step 2: Go back around through the beads that you strung in the last step, grab your tail thread and tie another tight knot:
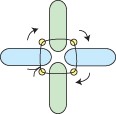

Step 3: Go back around through the Color2 Cali bead, the Color1 seed bead and the Color1 Cali bead highlighted in RED:
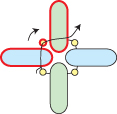

Step 4: Go around and across through the middle hole of the Color1 Cali bead That you exited at the end of the last step (highlighted in RED):
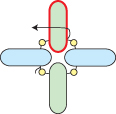

Step 5: Now you will add a middle ring of seed beads between the middle holes of the Cali beads.

String three Color1 seed beads. Go down through the middle hole of the Color2 Cali bead highlighted in RED:
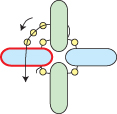

Step 6: String three Color1 seed beads. Go across through the middle hole of the Color1 Cali bead highlighted in RED:
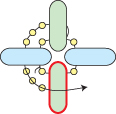

Step 7: String three Color1 seed beads. Go up through the middle hole of the Color2 Cali bead highlighted in RED:
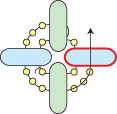

Step 8: String three Color1 seed beads. Go across through the middle hole of the Color1 Cali bead highlighted in RED:
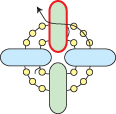

Pull tight and as you do, the motif will begin to dome slightly and form a hill, of sorts.

Step 9: Go back around through the beads highlighted in RED, pulling tight so that the motif continues to dome:
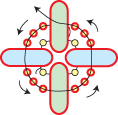

Step 10: Go around and across through the top hole of the same Color1 Cali bead that you exited at the end of the last step (highlighted in RED):
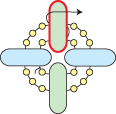

Step 11: Now you will add an outer ring of seed beads between the outer holes of the Cali beads.

String five Color1 seed beads. Go down through the outside hole of the Color2 Cali bead highlighted in RED:
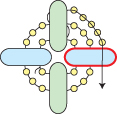


Step 12: String five Color1 seed beads. Go across through the outside hole of the Color1 Cali bead highlighted in RED:
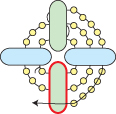

Step 13: String five Color1 seed beads. Go up through the outside hole of the Color2 Cali bead highlighted in RED:
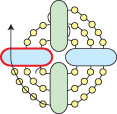

Step 14: String five Color1 seed beads. Go across through the outside hole of the Color1 Cali bead highlighted in RED to finish the motif, pulling tight so that the motif continues to dome and form a hill:
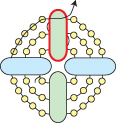

Step 15: Go back around through the beads highlighted in RED, pulling tight to keep the motif domed:
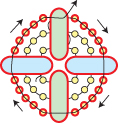

You’ve just finished the first motif. Now you will repeat Steps 16-35 to add more Hilltop motifs. When your band is the length you want it, you will add Color2 seed beads in between the motifs to stabilized the “hills” and keep them from flopping around.

Step 16: Go across through the Color1 seed bead highlighted in RED:
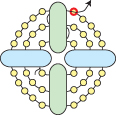

Step 17: String two Color2 seed beads, a Color1 seed bead, a Color1 Cali bead, a Color1 seed bead and two Color2 seed beads.

Go around and back across through the Color1 seed bead, the Color1 Cali bead and the Color1 seed bead highlighted in RED:
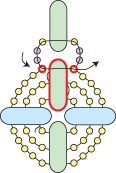

Step 18: Go back around through the beads that you just added (highlighted in RED):
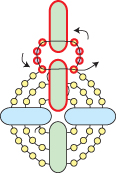

Step 19: Go back through the seed beads and the bottom hole of the Cali bead highlighted in RED:
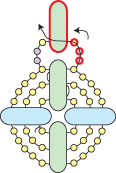

Step 20: Go around and across through the middle hole of the Color1 Cali bead that you just exited and then around and across through the top hole of this same Color1 Cali bead (highlighted in RED):
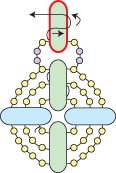

Step 21: String a Color1 seed bead, a Color2 Cali bead, a Color1 seed bead, a Color1 Cali bead, a Color1 seed bead, a Color2 Cali bead and a Color1 seed bead.

Go around and back across through the top hole of the Color1 Cali bead that you exited at the end of the last step (highlighted in RED):
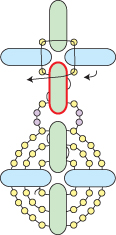

Step 22: Go back around through the beads that you just added (highlighted in RED):
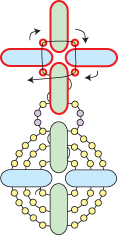

Step 23: Go around and across through the middle hole of this same Color1 Cali bead (highlighted in RED):
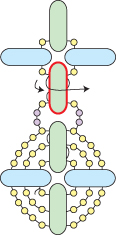

Now you will add a middle ring of seed beads between the middle holes of the Cali beads.

Step 24: String three Color1 seed beads. Go up through the middle hole of the Color2 Cali bead highlighted in RED:
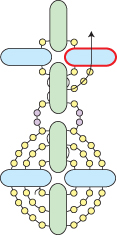

Step 25: String three Color1 seed beads. Go across through the middle hole of the Color1 Cali bead highlighted in RED:
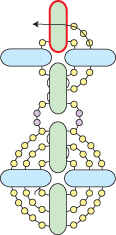

Step 26: String three Color1 seed beads. Go down through the middle hole of the Color2 Cali bead highlighted in RED:
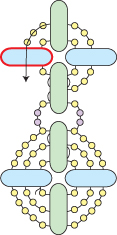

Step 27: String three Color1 seed beads. Go across through the middle hole of the Color1 Cali bead highlighted in RED:
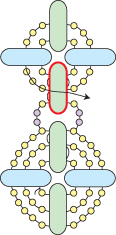

Pull tight and as you do, the motif will begin to dome slightly and form another hill.

Step 28: Go back around through the beads highlighted in RED, pulling tight so that the motif continues to dome:
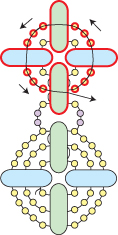

Step 29: Go around and across through the bottom hole of the same Color1 Cali bead that you exited at the end of the last step (highlighted in RED).

Continue across through the Color1 seed bead, also highlighted in RED:
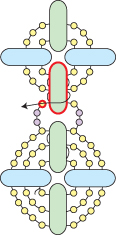

Now you will add an outer ring of seed beads between the outer holes of the Cali beads.

Step 30: String four Color1 seed beads. Go up through the outside hole of the Color2 Cali bead highlighted in RED:
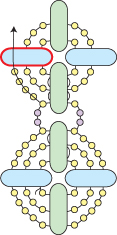

Step 31: String five Color1 seed beads. Go across through the outside hole of the Color1 Cali bead highlighted in RED:
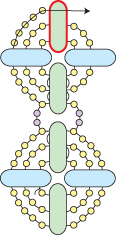

Step 32: String five Color1 seed beads. Go down through the outside hole of the Color2 Cali bead highlighted in RED:
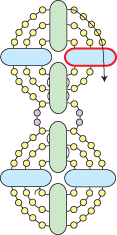
Step 33: String four Color1 seed beads. Go across through the Color1 seed bead, the outside hole of the Color1 Cali bead and the Color1 seed bead highlighted in RED to finish the motif, pulling tight so that the motif continues to dome and form a hill:
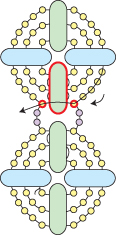

Step 34: Go back around through the beads highlighted in RED, pulling tight to keep the motif domed:
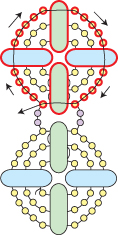

You’ve just finished the second motif.

Step 35: Go back up through beads highlighted in RED:
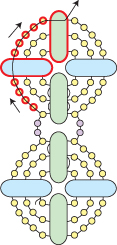

Step 36: Repeat Step 16 to Step 35 until your bracelet is the length you want it, minus about a half-inch and the length of your clasp:


In the following steps, you will add Color2 seed beads in between the motifs to stabilized the “hills” and keep them from flopping around.

Step 37: Go down through the five Color1 seed beads, the Color2 Cali bead and the three Color1 seed beads highlighted in RED:


Step 38: String four Color2 seed beads. Go down through the three Color1 seed beads before the next Color2 Cali bead, the Color2 Cali bead and the three Color1 seed beads after the Color2 Cali bead (highlighted in RED):


Step 39: String four Color2 seed beads. Go down through the three Color1 seed beads before the next Color2 Cali bead, the Color2 Cali bead and the three Color1 seed beads after the Color2 Cali bead (highlighted in RED):


Step 40: Repeat the last step all the way around the outer edge of your band:


Step 41: To attach your clasp, weave your way out of the top hole of the last Color1 Cali bead (highlighted in RED):


Step 42: String three seed beads. Go through your clasp and then back down through the last seed bead that you just strung.

String two more seed beads. Go across through the top hole of the Color1 Cali bead that you exited at the end of the last step (highlighted in RED):
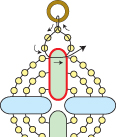

Step 43: Go back around through the beads highlighted in RED and the clasp:
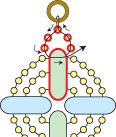

Use your extra tail thread to go back through the beads along the outer edges. Knot in several places and then cut your thread.

To attach the clasp to the other end of your band, thread your needle with the tail thread from Step 1. 

Repeat Step 41 to 43.

Saturday, December 23, 2017

Tip! Needles and Thread

I am often asked what kind of needles and thread I use when beading the jewelry I design and create. Although there are many different brands of needles and types of thread available, every beader has a personal preference and this preference will change over time. When following a pattern, it is always best to use the type of thread and weight that the designer specifies. This “tip” is about my preferences and in no way includes info on all of the different options and products that are on the market but I hope it answers some of your questions!


Needles


Beading needles are different from regular needles that you use for sewing or embroidery in that they are often longer and more flexible. When I first started beadweaving, I used big eye needles. They are wonderfully easy to thread and come in many different sizes and brands. At the time, I was primarily exploring right-angle weave. As I ventured into peyote, herringbone and more intricate right-angle weave, however, I found that the big eye needles just would not work for me anymore. Quite simply, they got stuck.

From there I switched over to John James brand English beading needles. You can buy them in packages of four that contain several different needles sizes but most beaders buy them in packages of 25. They come in needle sizes 10, 11, 12, 13 and 15 (the larger the number, the thinner the needle) and in “regular” (about 2 inches long) and “short” (about 1.5 inches long) needle lengths. The “short” needles, also called “sharps”, are too short for me so I prefer the “regular” needles. Size 10 and 11 work for most beadwork that I do and I use size 12 for peyote bezel work but I have never needed to use anything smaller.

At first you may wonder, 25 needles per pack?… what will I ever do with so many and in several sizes to boot! Well, beading needles bend, they break—you will be amazed at how fast they go.

Although I still have many packets of John James needles, several years ago I discovered Japanese Tulip brands needles and I just positively love them. They are they only needles I use now, mostly in sizes 10 and 11. Although they are much more expensive than most brands, they do last longer, break less and seem easier to thread.


 Thread


When I first started to bead, my thread of choice was Nymo. I still own pretty much every color and lots of little blocks of beeswax that I would use to condition the Nymo and keep it from tangling, which it did not. When I became somewhat of a bicone crystal fiend, I found that the Nymo just did not hold up over time no matter how many thread passes I made through the crystal. I switched to C-Lon, which seemed better, but then I discovered Berkley FireLine. What a change in my beading life that was! It is all I ever use now, even though basically, it only comes in two colors: “Smoke” (a gray/black) and “Crystal” (white as white can be):

https://www.amazon.com/Beadsmith-FireLine-Braided-Beading-Thread/dp/B00OLCKV0M/ref=as_li_ss_tl?s=arts-crafts&ie=UTF8&qid=1514086617&sr=1-7&keywords=fireline+beading+thread+6+lb&linkCode=ll1&tag=espregraph-20&linkId=84b20f0f8e801a86d589ff61bfc70dc5 

So what is FireLine? FireLine is a fishing line, more specifically—a “braided monofilament thread”. It is very different from the clear “single mono-filament” fishing line that you may have used when fishing as a kid and what many Japanese beaders use in their beaded designs. FireLine is not clear and although it is as fine and flexible as thread, it is much stronger because, basically, it was created for catching fish and not beading.

Figuring out which weight of FireLine to use can get a bit confusing. These are my guidelines (and again, they differ for each designer). I use:
  • 4lb FireLine for all of my rivoli patterns where you need to create a peyote bezel
  • 8lb FireLine for crystal ornaments
  • 6lb Fireline for pretty much every other project I have designed over the last decade or so
So what does this pound-stuff mean? Again, we’re fishing! You can buy FireLine in any store that sells fishing gear, in spool sizes of 50, 125, 300 and even 1500 yards. The weight (thickness) measurement is in pounds, also called "break strength" or “test”—4lb, 6lb and all the way to 30lb. This pound weight refers to fish weight—how big of a fish can you haul in before the line snaps and I suppose how big of a fight the fish puts up is also a factor. As such, you may think that you need 30lb weight FireLine to bead a bracelet for Aunt Doris cause she's pretty rough on jewelery but chances are that the line will be too thick to get through the beads so keep an eye out on the diameter as well. It is usually listed in millimeters (mm) or inches (in) along with the pound weight. Here is a handy chart:

4lb = .13mm/.005 in. diameter
6lb = .15 mm/.006 in. diameter
8lb = .18 mm/.007 in. diameter
10lb = .20 mm/.008 in. diameter
14lb = .23 mm/.009 in. diameter
20lb = .30 mm/.012 in. diameter
30lb = .38 mm/.015 in. diameter

When buying FireLine, it can get a bit confusing because sometimes you will see two different "lb" weights for the same spool. For instance, in the image above, the weight is listed as 6lb but then in smaller print to the right, it says 2lb/.15mm Diameter. This second, smaller weight is the "mono equivalent"—a value needed when fishing but not so when beading so ignore it. Go with the first pound value and when in doubt, check the diameter.

You can purchase Berkley Fireline at any store that sells fishing gear. I love FishUSA.com and Cabelas.com but you really can't beat eBay for a great buy. Beadsmith and Beadalon (Wildfire) have their own brand of Fireline available for sale. I have yet to see a difference between these products and Berkley's FireLine brand but they are more widely available at most bead shops than Berkely FireLine.

https://www.amazon.com/FireLine-Braided-Beading-Thread-006-Inches/dp/B00AWCS1IO/ref=as_li_ss_tl?ie=UTF8&qid=1514086393&sr=8-4&keywords=6lb+fireline&linkCode=ll1&tag=espregraph-20&linkId=e47780dad57482faa767f95eaf38c6b5https://www.amazon.com/Beadalon-WildFire-006-Inch-Black-125-Yard/dp/B001TLDHY0/ref=as_li_ss_tl?s=arts-crafts&ie=UTF8&qid=1514086493&sr=1-2&keywords=wildfire&linkCode=ll1&tag=espregraph-20&linkId=c394fd29cefa46805c5a3d32a3461c51


The greatest downside of Fireline, however, is that it will easily kill a nice pair of scissors so get yourself a good pair of cutters—especially Kevlar scissors/shears. I love the Xuron Kevlar Scissors. Although pricey, they last years:


Again, your preferences for needles and thread will change as your beading evolves and as new products come on the market. These are my preferences right now but they are always evolving

Wednesday, August 30, 2017

New free pattern: Tile Bead Stacker

Tila Bead Stacker, free pattern

I launched my free Tile Bead Stacker pattern today and some have asked about the pretty turquoise matte beads with the swirl in the center band and about the new Tile Mini beads so I decided it was time for a blog post!

First off, my free Tile Bead Stacker pattern is here:

There's a downloadable PDF at the end of the step text. You can use 5mm by 5mm Miyuki Tila beads or Tile Mini beads, or full-sized 6mm by 6mm Czechmates (or other brands) tile beads, to create these fun and easy stacker bracelets. Triple the length and make some awesome wrap bracelets. Winter is coming!

Tila Bead Stacker, free pattern

Now about those turquoise matte tile beads with the swirl… Technically, they are called 6mm by 6mm “laser etched” tile beads and I have yet to figure out who the manufacturer is. I got mine a while back on Etsy at a lovely shop called The Bead Bungalow. As of this writing, the shop is out of that particular color, but the listing is still up here: Laser Etched Czech Glass Beads - Turquoise Opaque Matte with Rainbow Etched Ammonite Swirl:

This wonderful little Etsy shop still has other laser etched beads, though, and you should be able to see them by clicking HERE.

You can find more if you search Etsy or Google for "laser etched 6mm tile beads”. Yesterday, I found some at Limabeads.com and ordered them in some different colors. As with The Bead Bungalow, they are out of that particular turquoise matte but have some other pretty color combos HERE.

Tila Bead Stacker, free pattern

And what about about those yummy Bordeaux tile beads also pictured? They are called Tile Mini beads. Note: I originally referred to them as Mini Tile beads but I have corrected that in my web instructions and uploaded a new PDF, although I am seeing other shops list them as Mini Tile beads as well… whatever, I just love them. They measure 5mm by 5mm so they are smaller than the original and immensely popular 6mm by 6mm Czechmates tile beads that have been on the market for a while now. The Tile Mini beads are also more “square” and uniform, in my opinion, which makes them all the more wonderful, also my opinion. 

I got my supply of Tile Mini beads from Donna Manning’s wonderful Etsy shop called Queen City Bead. Here is a direct link to that Pastel Bordeaux Mini Tile bead that I used in the photo above: 
You can find more Tile Mini bead colors and coatings at her Etsy shop and by clicking HERE.

My friend Betsy Ramsey of RedPandaBeads.com also has a great selection of Tile Mini beads in as well here:
https://www.redpandabeads.com/category_s/3955.htm.
They are showing up at more and more bead shops so I hope we’ll continue to see more new colors and coatings.

I am in the process of rebeading many of my older Miyuki Tila bead patterns and I’m finding that these Tile Mini beads work beautifully as a Tila bead substitute when you want a two-hole tile bead that is heavier and a bit less delicate than Tila beads but basically the same width and height. More on this later!

Friday, December 9, 2016

New “Mini” Silky bead!

When Linda Genaw of Linda’s Crafty Inspirations first emailed to tell me of a new smaller 5x5mm Silky bead on the market, my first response was, “Oh, dear god, just kill me now….I can understand a 4mm Silky bead—that would be cool—but 5mm? 1mm difference? 1-freaking-mm difference? It is just enough to throw off an entire pattern but serves no other real purpose that I can see, sigh.” 

Then Linda measured them and determined that they are, in fact, a bit smaller than 5x5mm. Betsy Ramsey of RedPandaBeads.com hunted some down and sent samples to me and yes, okay, they are adorable!

However, the 5mm Silky beads cannot be substituted for 6mm Silky beads in any of my designs without some tweaks. At this time, I have no plans to tweak all of my patterns that use 6mm Silky beads to accommodate the new “mini” 5x5mm Silky beads but they worked so well with my Silky Squares Bracelet and Earrings pattern that I created what I am calling an “addendum” of substitution instructions. 

 Silky Squares Bracelet and Earrings

For those of you who have already purchased my Silky Squares pattern, this one-page addendum is a free download on the pattern page here: http://www.aroundthebeadingtable.com/Patterns/SilkySquares.html.

The addendum is now (and forever) part of the PDF for purchase, which is on sale for $2.50 through next Friday at my website only, AroundTheBeadingTable.com. Betsy at RedPandaBeads.com has the new “mini” 5x5mm Silky beads for sale here: http://www.redpandabeads.com/category_s/3669.htm.

You’ll find links to exact beads used in the photo above at the bottom of the pattern page but I will also include them here. Note: One strand of 40 “mini” silky beads is enough to make a 7-inch bracelet but not enough for the earrings as well.


Mini Silky Squares bracelet:
• About 400 size 11/0 seed beads: Miyuki #1052 Galvanized Gold
• About 36 size 8/0 seed beads: Miyuki #454 Metallic Dark Plum Iris
• About 36 SuperDuo beads: Pastel Bordeaux
• About 36 two-hole 5x5mm “Mini” Czech Silky beads: Chalk Luster


Mini Silky Squares earrings:
• About 100 size 11/0 seed beads: Miyuki #1052 Galvanized Gold
8 size 3mm fire-polished beads: Czech Iris Purple
• 8 SuperDuo beads: Pastel Bordeaux
• 4 two-hole 5x5mm “Mini” Czech Silky beads: Chalk Luster
• 4 two-hole 5x5mm “Mini” Czech Silky beads: Lilac Luster