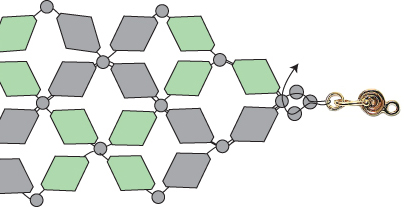
Byway Band
(©2019 Deborah Roberti)
Using Miyuki rocaille seed beads, 3mm beads, GemDuo
beads and Chevron Duo beads, this skinny Byway Band can be beaded up in
different colors and stacked or triple the length and create an awesome
wrap bracelet.
(for a 6.75-inch bracelet, not including clasp)
• About 2 yards of 6 lb. FireLine
• About 150 size 11/0 Miyuki rocaille seed beads
• About 19 size 3mm beads (fire-polished and round/druk beads worked best for me)
• About 6 Matubo GemDuo beads (or DiamonDuo beads)
• About 12 Matubo Chevron Duo beads (10x4mm chevron-shaped two-hole beads from Matubo)
• clasp
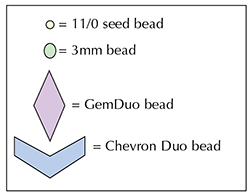
For this tutorial, position the Chevron Duo beads the way they appear in my illustrations as you add them.
Step 1: Thread your needle with about two yards of FireLine (or start with a length that you are comfortable working with and add more later).
Leaving a 10-inch tail for attaching your clasp, hold onto this tail thread and string two seed beads, a 3mm bead and two more seed beads.
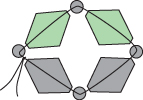
Go up through the right hole of a Chevron Duo bead:

Step 2: String two seed beads and go across through the bottom hole of a GemDuo bead.
String two more seed beads and go down through the left hole of the Chevron Duo bead that you just exited.
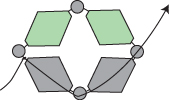
Grab your tail thread and tie a tight double knot:

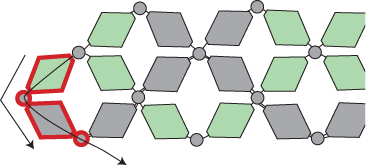
Step 3: Go back around through the two seed beads, the 3mm bead, the two seed beads, the right hole of the Chevron Duo bead, the two seed beads and the bottom hole of the GemDuo bead highlighted in RED:

Step 4: String a seed bead, a 3mm bead and a seed bead.
Go around and across through the top hole of the GemDuo bead that you added earlier (highlighted in RED):

Step 5: String a seed bead, a 3mm bead and a seed bead.
Go around and across through the bottom hole of this same GemDuo bead (highlighted in RED):

Step 6: Go back up and around through the seed bead, the 3mm bead, the seed bead and the top hole of the GemDuo bead highlighted in RED:

Step 7: String two seed beads and go up through the right hole of a new Chevron Duo bead.
String two seed beads, a 3mm bead and two seed beads. Go around and down through the left hole of this same Chevron Duo bead.
String two more seed beads and go back across through the top hole of the GemDuo bead that you just exited (highlighted in RED):

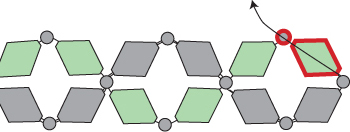
Step 8: Go back up and around through the two seed beads, the right hole of the Chevron Duo bead, the two seed beads, the 3mm bead, the two seed beads and the left hole of this same Chevron Duo bead highlighted in RED:

Step 9: Go back down and around through the three seed beads, the 3mm bead, the three seed beads, the left hole of the Chevron Duo bead, the two seed beads, the 3mm bead, the two seed beads and the right hole of this same Chevron Duo bead highlighted in RED:

NOTE: You may have to untwist the two sets of three seed beads above and below the 3mm bead to straighten them out a bit as you go through them.
Step 10: Go back up and around through the three seed beads, the 3mm bead, the three seed beads, the right hole of the Chevron Duo bead, the two seed beads and the 3mm bead highlighted in RED, untwisting and straightening the seed beads as needed:

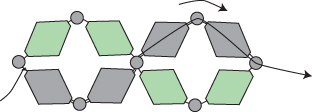
You just finished the first Byway Band motif and you will repeat Step 11 to Step 20 to add more.
Step 11: To start the next Byway motif, string two seed beads and go up through the left hole a new Chevron Duo bead.
String two seed beads and go across through the bottom hole of a new GemDuo bead.
String two more seed beads and go down through the right hole of the Chevron Duo bead that you just added.
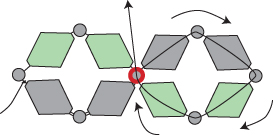
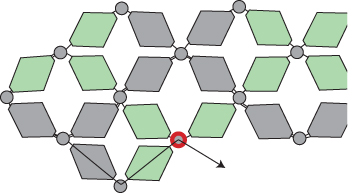
String two more seed beads and go back across through the 3mm bead that you exited at the end of the last step (highlighted in RED):

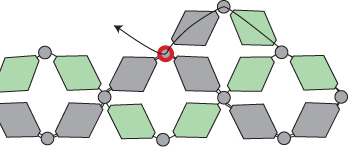
Step 12: Go back up and around through the two seed beads, the left hole of the Chevron Duo bead, the two seed beads and the bottom hole of the GemDuo bead highlighted in RED:

Step 13: String a seed bead, a 3mm bead and a seed bead.
Go around and across through the top hole of the GemDuo bead that you added earlier (highlighted in RED):

Step 14: String a seed bead, a 3mm bead and a seed bead.
Go around and across through the bottom hole of this same GemDuo bead (highlighted in RED):

Step 15: Go back up and around through the seed bead, the 3mm bead, the seed bead and the top hole of the GemDuo bead highlighted in RED:

Step 16: String two seed beads and go up through the left hole of a new Chevron Duo bead.
String two seed beads, a 3mm bead and two seed beads. Go around and down through the right hole of this same Chevron Duo bead.
String two more seed beads and go back across through the top hole of the GemDuo bead that you just exited (highlighted in RED):

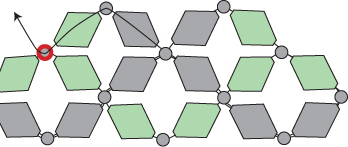
Step 17: Go back up and around through the two seed beads, the left hole of the Chevron Duo bead, the two seed beads, the 3mm bead, the two seed beads and the right hole of this same Chevron Duo bead highlighted in RED:

Step 18: Go back down and around through the three seed beads, the 3mm bead, the three seed beads, the right hole of the Chevron Duo bead, the two seed beads, the 3mm bead, the two seed beads and the left hole of this same Chevron Duo bead highlighted in RED, untwisting and straightening the seed beads as needed:

Step 19: Go back up and around through the three seed beads, the 3mm bead, the three seed beads, the left hole of the Chevron Duo bead, the two seed beads and the 3mm bead highlighted in RED, untwisting and straightening the seed beads as needed:

You just finished the second Byway motif.
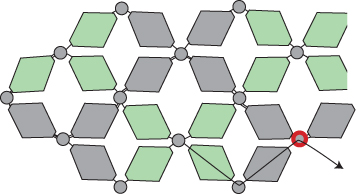
Step 20: Flip the band over horizontally so you that you are exiting from the left side of the top-most 3mm bead and can continue to follow the steps as written:

Step 21: Repeat Step 11 to Step 20 until your band is the length you want it, minus the length of your clasp and about a third-inch:

Step 22: To attach your clasp, string three seed beads.
Go through your clasp and back through the last seed bead that you just strung:

NOTE: To make your band longer, just add more seed beads—or a combination of seed beads and 3mm beads—than directed in this step and the next.
Step 23: String two more seed beads.
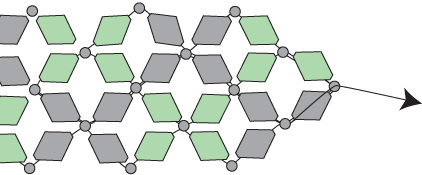
Go back across through the 3mm bead that you exited earlier (highlighted in RED):

Step 24: Go back around through the beads highlighted in RED and the clasp several times:

Weave into the band, knot in several places and then cut your thread.
Step 25: To attach the clasp to the other end of your band, thread your needle with the tail thread from Step 1.
Go up through the two seed beads and 3mm bead highlighted in RED:

Repeat Steps 22-24.


