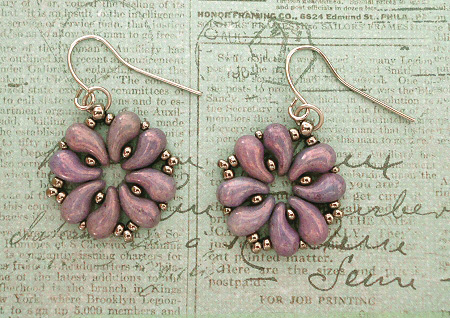
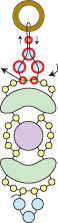
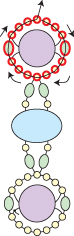
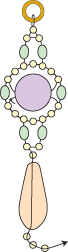
Alchemy Bracelet & Earrings
(©2022 Deborah Roberti)

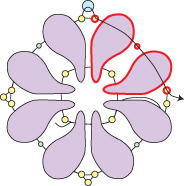
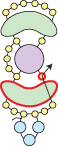
Use size 11/0 Miyuki seed beads, 3mm beads (round or fire-polished), 6mm round beads and most any two-hole beads (including Beadsmith Cymbal Connector beads) to make this versatile bracelet and matching earrings.
MATERIALS
Bracelet
(For about a 6.75 to 7-inch bracelet, not including clasp—length will vary depending on the two-hole beads you use.)
• About 2-3 yards of 6 lb. FireLine
• About 100-150 Miyuki “rocaille” size 11/0 seed beads
• About 36-42 size 3mm beads (fire-polished or round beads)
• About 6-7 size 6mm round beads
• About 5-6 two-hole beads (You can use most any two-hole beads, including Beadsmith Cymbal Connector beads, and the bigger the better, I find.)
• Clasp
Earrings
• About 4 feet of 6 lb. FireLine
• About 40 Miyuki “rocaille” size 11/0 seed beads
• About 12 size 3mm beads (fire-polished or round beads)
• Two size 6mm round beads
• Two drop beads of your choice in type and size (You can also use more 6mm beads, bicones, stacks of smaller beads—the sky’s the limit!)
• Two 3-4mm closed (soldered) jump rings or Two Beadsmith Bead Ending Cymbal Elements (I used the Beadsmith Remata Bead Ending Cymbal Elements in my samples but many others will also work.)
• A pair of earring findings
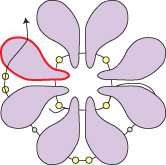
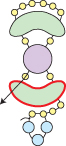
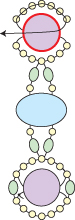
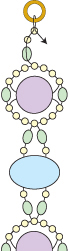
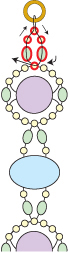
Step 1: Thread your needle with a length of FireLine that you feel comfortable working with and add more as you need it.
Leaving about a 10-inch tail for attaching your clasp, string seven seed beads and a 6mm bead. Tie the beads together with a tight double knot:

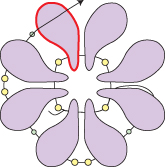
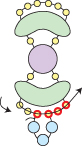
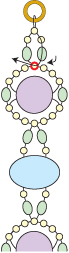
Step 2: Go back across through the 6mm bead that you just added (highlighted in RED):

Step 3: String seven seed beads. Go around and back across through the 6mm bead that you just exited (highlighted in RED):

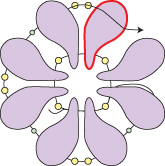
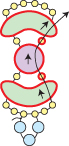
Step 4: Go back around through the seven seed beads that you just added (highlighted in RED):

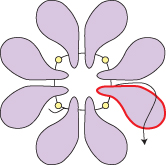
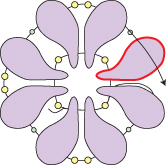
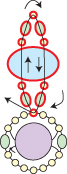
Step 5: String a 3mm bead.
Go around through the seven seed beads beneath the 6mm bead (highlighted in RED) so that the 3mm bead sits between the top and bottom sets of seven seed beads:

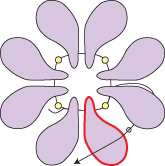
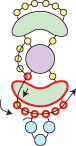
Step 6: String another 3mm bead. Go back around through the seven seed beads above the 6mm bead (highlighted in RED) so that the 3mm bead sits between the top and bottom sets of seven seed beads:

Step 7: Go back around through the seed beads and 3mm beads highlighted in RED:

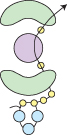
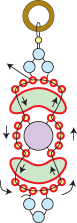
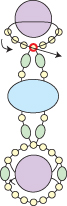
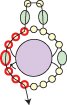
Step 8: String a 3mm bead and a seed bead. Go up through the left hole of a two-hole bead.
String a seed bead, a 3mm bead, a seed bead, a 3mm bead and a seed bead. Go around and down through the right hole of this same two-hole bead.
String a seed bead and a 3mm bead. Go across through the seed bead that you exited at the end of the last step (highlighted in RED):
Step 9: Go back around through the beads that you just added (highlighted in RED):
Step 10: Go back up through the 3mm bead, the seed
bead, the left hole of the two-hole bead, the seed bead, the 3mm bead
and the seed bead highlighted in RED:
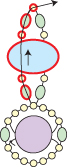
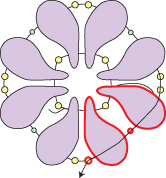
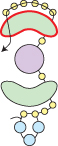
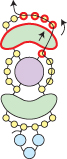
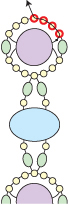
Step 11: String three seed beads, a 6mm bead and three more seed beads.
Go around and back across through the seed bead that you just exited (highlighted in RED):
Step 12: Go back around through the three seed beads and 6mm bead that you just added (highlighted in RED):
Step 13: String seven seed beads. Go around and back across through the 6mm bead that you just exited (highlighted in RED):
Step 14: Go back around through the seven seed beads that you just added (highlighted in RED):
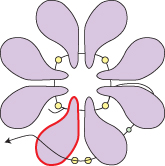
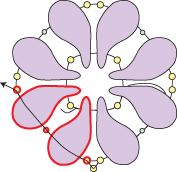
Step 15: String a 3mm bead. Go around through the seven seed beads beneath the 6mm bead (highlighted in RED) so that the 3mm bead sits between the top and bottom sets of seven seed beads:
Step 16: String another 3mm bead. Go back up through the four seed beads highlighted in RED so that the 3mm bead sits between the top and bottom sets of seven seed beads:
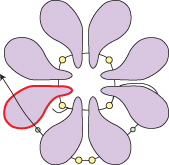
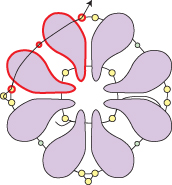
Step 17: Go back around through the beads highlighted in RED:
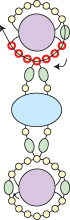
Step 18: Flip the bracelet over horizontally so
that you are exiting from the left side of the top seed bead instead of
the right side to continue to follow the directions as written and
illustrated:
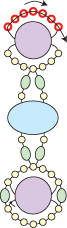
NOTE: When you add the two-hole beads,
many of which have a front and back side, in subsequent repeats of Step
8 to 18, make sure that they are all facing in the same direction.
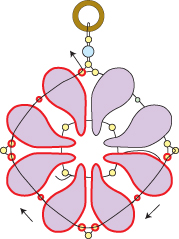
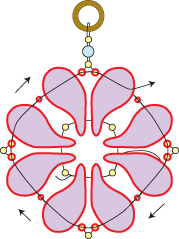
Step 19: Repeat Step 8 to Step 18 until your bracelet is the length you want it, minus the length of your clasp and about a half-inch:

NOTE: You can add more beads when you attach the clasp to make your bracelet longer.
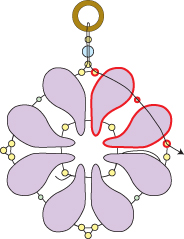
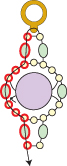
Step 20: To attach your clasp, string a 3mm bead and two seed beads. Go through your clasp and back down through the last seed bead that you just strung:
NOTE: To make your bracelet longer, just add more beads than directed in this step and the next.
Step 21: String a seed bead and a 3mm bead. Go back across through the seed bead at the top of the bracelet that you exited earlier (highlighted in RED):
Step 22: Go back around through the beads highlighted in RED and the clasp several times:
Weave into the bracelet, knot in several places and then cut your thread.
Step 23: To attach the clasp to the other end of your bracelet, thread your needle with the tail thread from Step 1.
Go up through the four seed beads highlighted in RED:
Repeat Steps 20-22.
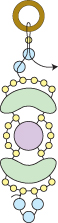
Alchemy Earrings

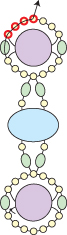
Step 1: Thread your needle with about two feet of FireLine.
Leaving about a 6-inch tail that you can cut and weave in later, string seven seed beads and a 6mm bead. Tie the beads together with a tight double knot:

Step 2: Go back across through the 6mm bead that you just added (highlighted in RED):

Step 3: String seven seed beads. Go around and back across through the 6mm bead that you just exited (highlighted in RED):

Step 4: Go back around through the seven seed beads that you just added (highlighted in RED):

Step 5: String a 3mm bead. Go around through the seven seed beads beneath the 6mm bead (highlighted in RED) so that the 3mm bead sits between the top and bottom sets of seven seed beads:

Step 6: String another 3mm bead. Go back around through the seven seed beads above the 6mm bead (highlighted in RED):

Step 7: Go back around through the seed beads and 3mm beads highlighted in RED:

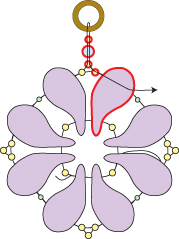
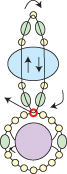
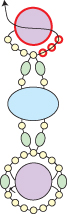
Step 8: String a 3mm bead, two seed beads and a 3mm bead.
Go around and down through the three seed beads, the 3mm bead and the three seed beads along the left side of the earring (highlighted in RED):
Step 9: String a 3mm bead, two seed beads and a 3mm bead.
Go around and up through the three seed beads, the 3mm bead, the three seed beads, the 3mm bead and the seed bead along the right side of the earring (highlighted in RED):

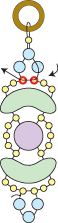
Step 10: String a seed bead, go through your jump ring and then back down through the same seed bead that you just strung.
Continue down through the seed bead, the 3mm bead, the three seed beads, the 3mm bead, the three seed beads, the 3mm bead and the seed bead along the left side of the earring (highlighted in RED):

OPTIONAL: Instead of using a jump ring, you can use a Beadsmith Bead Ending Cymbal Element.
I used a Remata Cymbal for my samples but many other Bead Ending Cymbal Elements will work in much the same fashion.
Go through the bottom hole of your Cymbal. Continue back down through the beads highlighted in RED:
Step 11: To add a drop bead, string a seed bead, your drop bead and three more seed beads:
NOTE: You can also use more 6mm beads, bicones or stacks of smaller beads as drop beads—the sky’s the limit!
Step 12: Go around and back up through the drop bead, the two seed beads, the 3mm bead and the three seed beads above (highlighted in RED) so that the three seed beads that you added in the last step form a seed bead picot below the drop bead. You may have to position the seed beads into place with your fingers:
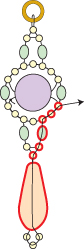
Step 13: Go back around through the beads highlighted in RED and your jump ring/Cymbal Element:

Weave back into the earring, knot and cut your thread. Attach your earring finding to the jump ring/ Cymbal Element.