

Hilltop Band
©2017 Deborah Roberti

My love for the new Cali beads continues. All you need are Cali beads and 11/0 seed beads to make this simple band that has got a bit of dimension to it. Although you can make it flat by adding more seed beads or some bigger beads, I love the hilltops.
MATERIALS
(for a 7-inch bracelet, not including clasp)
• 4 yards of 6 lb. FireLine
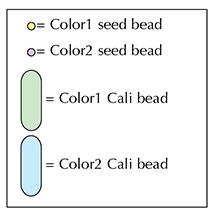
• About 400 size 11/0 Color1 seed beads
• About 120 size 11/0 Color2 seed beads
• About 20 Color1 Cali beads*
• About 20 Color2 Cali beads*
• clasp
*Cali beads are new Czech 3x8mm marquise-shaped beads with three holes!
(for a 7-inch bracelet, not including clasp)
• 4 yards of 6 lb. FireLine
• About 400 size 11/0 Color1 seed beads
• About 120 size 11/0 Color2 seed beads
• About 20 Color1 Cali beads*
• About 20 Color2 Cali beads*
• clasp
*Cali beads are new Czech 3x8mm marquise-shaped beads with three holes!
Step 1: Thread your needle with about 4 yards of FireLine (or start with a length that you feel comfortable working with and add more later).
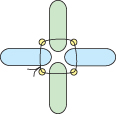
Leaving about a 10-inch tail for attaching a clasp, string a Color2 Cali bead, a Color1 seed bead, a Color1 Cali bead, a Color1 seed bead, a Color2 Cali bead, Color1 seed bead, a Color1 Cali bead and Color1 seed bead.
Tie the beads together in a circle with a tight double knot:
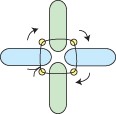
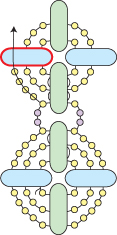
Step 2: Go back around through the beads that you strung in the last step, grab your tail thread and tie another tight knot:
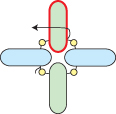
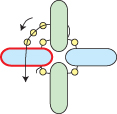
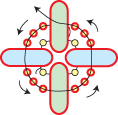
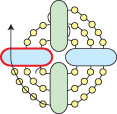
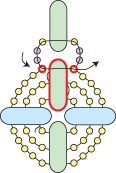
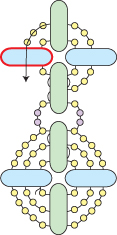
Step 3: Go back around through the Color2 Cali bead, the Color1 seed bead and the Color1 Cali bead highlighted in RED:

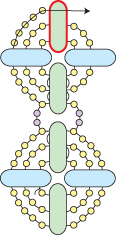
Step 4: Go around and across through the middle hole of the Color1 Cali bead That you exited at the end of the last step (highlighted in RED):
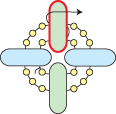
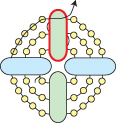
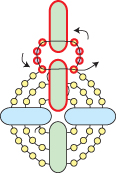
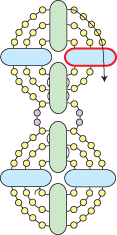
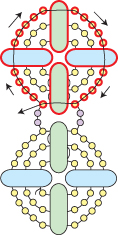
Step 5: Now you will add a middle ring of seed beads between the middle holes of the Cali beads.
String three Color1 seed beads. Go down through the middle hole of the Color2 Cali bead highlighted in RED:
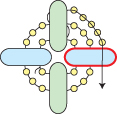
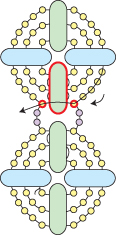
Step 6: String three Color1 seed beads. Go across through the middle hole of the Color1 Cali bead highlighted in RED:
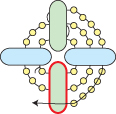
Step 7: String three Color1 seed beads. Go up through the middle hole of the Color2 Cali bead highlighted in RED:
Step 8: String three Color1 seed beads. Go across through the middle hole of the Color1 Cali bead highlighted in RED:
Pull tight and as you do, the motif will begin to dome slightly and form a hill, of sorts.
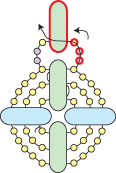
Step 9: Go back around through the beads highlighted in RED, pulling tight so that the motif continues to dome:
Step 10: Go around and across through the top hole of the same Color1 Cali bead that you exited at the end of the last step (highlighted in RED):
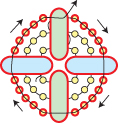
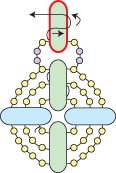
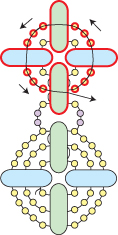
Step 11: Now you will add an outer ring of seed beads between the outer holes of the Cali beads.
String five Color1 seed beads. Go down through the outside hole of the Color2 Cali bead highlighted in RED:
Step 12: String five Color1 seed beads. Go across through the outside hole of the Color1 Cali bead highlighted in RED:
Step 13: String five Color1 seed beads. Go up through the outside hole of the Color2 Cali bead highlighted in RED:
Step 14: String five Color1 seed beads. Go across through the outside hole of the Color1 Cali bead highlighted in RED to finish the motif, pulling tight so that the motif continues to dome and form a hill:
Step 15: Go back around through the beads highlighted in RED, pulling tight to keep the motif domed:
You’ve just finished the first motif. Now you will repeat Steps 16-35 to add more Hilltop motifs. When your band is the length you want it, you will add Color2 seed beads in between the motifs to stabilized the “hills” and keep them from flopping around.
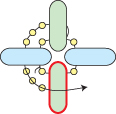
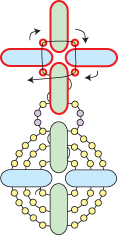
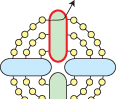
Step 16: Go across through the Color1 seed bead highlighted in RED:
Step 17: String two Color2 seed beads, a Color1 seed bead, a Color1 Cali bead, a Color1 seed bead and two Color2 seed beads.
Go around and back across through the Color1 seed bead, the Color1 Cali bead and the Color1 seed bead highlighted in RED:
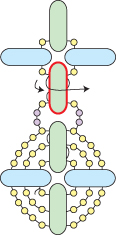
Step 18: Go back around through the beads that you just added (highlighted in RED):
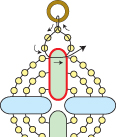
Step 19: Go back through the seed beads and the bottom hole of the Cali bead highlighted in RED:
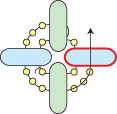
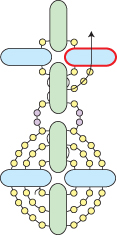
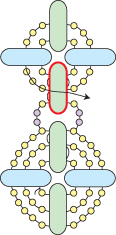
Step 20: Go around and across through the middle hole of the Color1 Cali bead that you just exited and then around and across through the top hole of this same Color1 Cali bead (highlighted in RED):
Step 21: String a Color1 seed bead, a Color2 Cali bead, a Color1 seed bead, a Color1 Cali bead, a Color1 seed bead, a Color2 Cali bead and a Color1 seed bead.
Go around and back across through the top hole of the Color1 Cali bead that you exited at the end of the last step (highlighted in RED):

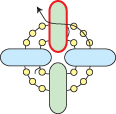
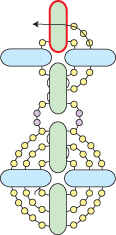
Step 22: Go back around through the beads that you just added (highlighted in RED):
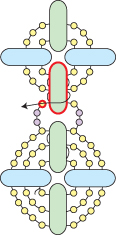
Step 23: Go around and across through the middle hole of this same Color1 Cali bead (highlighted in RED):
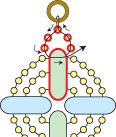
Now you will add a middle ring of seed beads between the middle holes of the Cali beads.
Step 24: String three Color1 seed beads. Go up through the middle hole of the Color2 Cali bead highlighted in RED:
Step 25: String three Color1 seed beads. Go across through the middle hole of the Color1 Cali bead highlighted in RED:
Step 26: String three Color1 seed beads. Go down through the middle hole of the Color2 Cali bead highlighted in RED:
Step 27: String three Color1 seed beads. Go across through the middle hole of the Color1 Cali bead highlighted in RED:
Pull tight and as you do, the motif will begin to dome slightly and form another hill.
Step 28: Go back around through the beads highlighted in RED, pulling tight so that the motif continues to dome:
Step 29: Go around and across through the bottom hole of the same Color1 Cali bead that you exited at the end of the last step (highlighted in RED).
Continue across through the Color1 seed bead, also highlighted in RED:
Now you will add an outer ring of seed beads between the outer holes of the Cali beads.
Step 30: String four Color1 seed beads. Go up through the outside hole of the Color2 Cali bead highlighted in RED:
Step 31: String five Color1 seed beads. Go across through the outside hole of the Color1 Cali bead highlighted in RED:
Step 32: String five Color1 seed beads. Go down through the outside hole of the Color2 Cali bead highlighted in RED:
Step 33: String four Color1 seed beads. Go across through the Color1 seed bead, the outside hole of the Color1 Cali bead and the Color1 seed bead highlighted in RED to finish the motif, pulling tight so that the motif continues to dome and form a hill:
Step 34: Go back around through the beads highlighted in RED, pulling tight to keep the motif domed:
You’ve just finished the second motif.
Step 35: Go back up through beads highlighted in RED:

Step 36: Repeat Step 16 to Step 35 until your bracelet is the length you want it, minus about a half-inch and the length of your clasp:

In the following steps, you will add Color2 seed beads in between the motifs to stabilized the “hills” and keep them from flopping around.
Step 37: Go down through the five Color1 seed beads, the Color2 Cali bead and the three Color1 seed beads highlighted in RED:

Step 38: String four Color2 seed beads. Go down through the three Color1 seed beads before the next Color2 Cali bead, the Color2 Cali bead and the three Color1 seed beads after the Color2 Cali bead (highlighted in RED):

Step 39: String four Color2 seed beads. Go down through the three Color1 seed beads before the next Color2 Cali bead, the Color2 Cali bead and the three Color1 seed beads after the Color2 Cali bead (highlighted in RED):

Step 40: Repeat the last step all the way around the outer edge of your band:

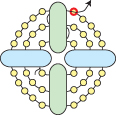
Step 41: To attach your clasp, weave your way out of the top hole of the last Color1 Cali bead (highlighted in RED):
Step 42: String three seed beads. Go through your clasp and then back down through the last seed bead that you just strung.
String two more seed beads. Go across through the top hole of the Color1 Cali bead that you exited at the end of the last step (highlighted in RED):
Step 43: Go back around through the beads highlighted in RED and the clasp:
Use your extra tail thread to go back through the beads along the outer edges. Knot in several places and then cut your thread.
To attach the clasp to the other end of your band, thread your needle with the tail thread from Step 1.
Repeat Step 41 to 43.


