

Crystal Windows Earrings
(©2018 Deborah Roberti)

A very simple and easy crystal erring pattern that matches my Crystal Windows Bracelet, Crystal Windows Cuff and Crystal Windows Necklace.
MATERIALS
• About two yards of 6 lb. FireLine or TOHO One-G
• About 70 size 11/0 seed beads
• 18 size 4mm fire-polished beads
• 8 size 4mm bicone crystals
• Two top-drilled drop beads (crystal briolette, pendant or dagger bead)
• two small (2-4mm) jump rings
• a pair of earring findings
• About two yards of 6 lb. FireLine or TOHO One-G
• About 70 size 11/0 seed beads
• 18 size 4mm fire-polished beads
• 8 size 4mm bicone crystals
• Two top-drilled drop beads (crystal briolette, pendant or dagger bead)
• two small (2-4mm) jump rings
• a pair of earring findings
Step 1: Thread your needle with about a yard of FireLine or One-G.
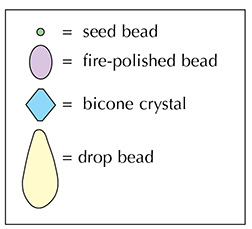
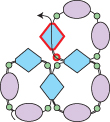
String a fire-polished bead, a seed bead, a bicone crystal, a seed bead, a bicone crystal, a seed bead, a fire-polished bead and a seed bead.
Leaving about a six-inch tail that you can weave in and cut at any time, tie the beads in a circle with a double knot:

Step 2: Go back around through the seed bead, the fire-polished bead, the seed bead, the bicone crystal, the seed bead and the bicone crystal that you just strung (highlighted in RED):

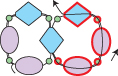
Step 3: String a seed bead, a fire-polished bead, a seed bead, a fire-polished bead, a seed bead, a bicone crystal and a seed bead.
Go around and back down through the bicone crystal that you exited at the end of the
last step (highlighted in RED):
last step (highlighted in RED):
Step 4: Go back around through the seed bead, the fire-polished bead, the seed bead, the fire-polished bead, the seed bead and the bicone crystal that you added in the last step (highlighted in RED):
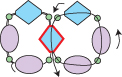
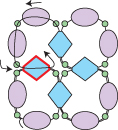
Step 5: String a seed bead, a bicone crystal, a seed bead, a fire-polished bead, a seed bead, a fire-polished bead and a seed bead.
Go around and back across through the bicone crystal that you exited at the end of the last step (highlighted in RED):
Step 6: Go back up through the seed bead and the bicone crystal that you added in the last step (highlighted in RED):
Step 7: String a seed bead, a fire-polished bead, a seed bead, a fire-polished bead
and a seed bead.
and a seed bead.
Go around and across through the bicone crystal highlighted in RED:
Step 8: String a seed bead. Go up through the bicone crystal and the seed bead, and then across through the fire-polished bead (all beads highlighted in RED):
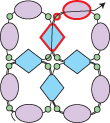
Step 9: Flip the motif about 45 degrees counterclockwise:

Step 10: Go back around through the beads in RED:

Step 11: Circle back around through the four seed beads in the center (highlighted in RED):
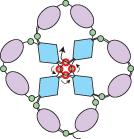
Step 12: Go back around through the beads highlighted in RED:
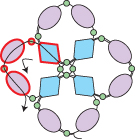
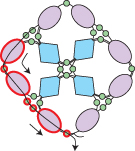
Step 13: String two seed beads.
Go back around through the beads highlighted in RED so that the two new seed beads fill the gap between the two fire-polished beads:
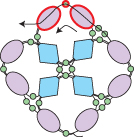
Step 14: String two seed beads.
Go back up through the beads highlighted in RED so that the two new seed beads fill the gap between the two fire-polished beads:
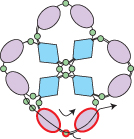
Step 15: String two seed beads.
Go back around through the beads highlighted in RED so that the two new seed beads fill the gap between the two fire-polished beads:
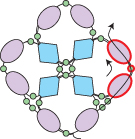
Step 16: String two seed beads.
Go back around through the beads highlighted in RED so that the two new seed beads fill the gap between the two fire-polished beads:
Step 17: String two seed beads, a drop bead and a two more seed beads.
Go back around through the seed bead that you exited at the end of the last step )highlighted in RED:
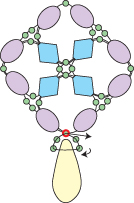
NOTE: Depending on the amount of space between the drill hole and the top of the drop bead, you may have to adjust the number of seed beads.
Step 18: Circle back around through the beads that you just added (highlighted in RED):
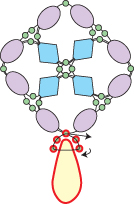
Step 19: Go back around through the beads highlighted in RED:
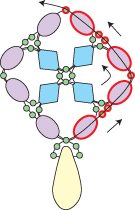
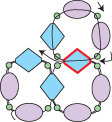
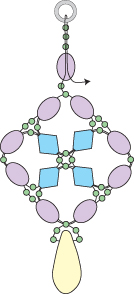
Step 20: To add the jump ring, string a seed bead, a fire-polished bead and three seed beads.
Go through the jump ring and then back down through beads that you just added:
Go through the jump ring and then back down through beads that you just added:
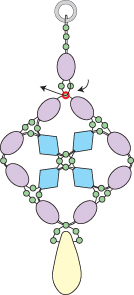
Step 21: String a seed bead.
Go back across through the seed bead highlighted in RED:
Step 22: Go back around through the beads highlighted in RED and jump ring for reinforcement:
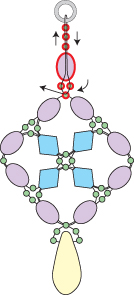
Weave back into the earring, knot and cut your thread. Attach your earring to your finding.
Very cute earrings! Thank you for the free pattern Deb!
ReplyDeleteSincerely,
Nicole