


I got my Matubo Mini GemDuo beads from RedPandaBeads.com here:
https://www.redpandabeads.com/Mini_GemDuo_Beads_s/6017.htm
MATERIALS
• About two yards of 6 lb. FireLine
• About 150 size 11/0 Miyuki rocaille seed beads (Toho brand seed beads will be a bit too fat)
• 10 Color1 size 6x4mm Matubo Mini GemDuo beads
• 30 Color2 size 6x4mm Matubo Mini GemDuo beads
• two small (2-4mm) closed (soldered) jump rings or two Beadsmith Cymbal Elements
• a pair of earring findings
Step 1: Thread your needle with about a yard of FireLine.
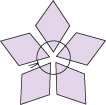
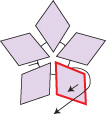
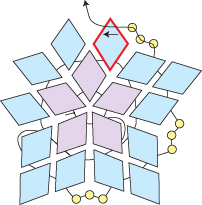
Leaving about a 6-inch tail that you can weave in and cut at any time, string five Color1 Mini GemDuo beads.
Tie the beads together with a tight double knot, forming a star of five of Mini GemDuo beads:
NOTE: Mini GemDuo beads have a tapered front side and a flat back side. Make sure the front side is facing in the same direction when you add each Mini GemDuo bead.
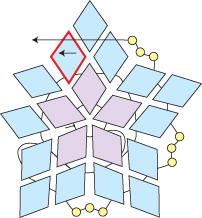
Step 2: Go back around through this star of five Mini GemDuo beads, grab your tail thread and tie another tight knot:
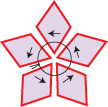
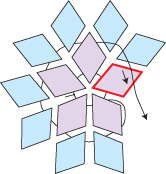
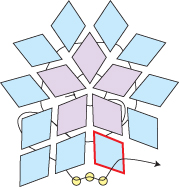
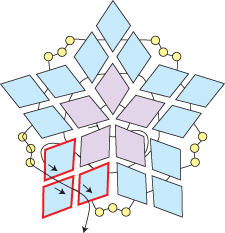
Step 3: Go back through the inside hole of the two Mini GemDuo beads highlighted in RED:
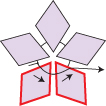
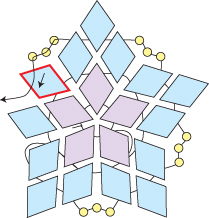
Step 4: Go around and through the outside hole of the Color1 Mini GemDuo bead that you exited at the end of the last step (highlighted in RED):
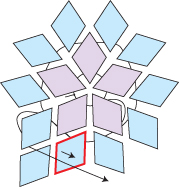
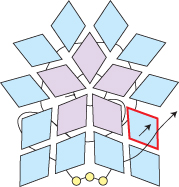
Step 5: String two Color2 Mini GemDuo beads and go up through the outside hole of the Color1 Mini GemDuo bead highlighted in RED:
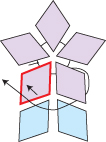
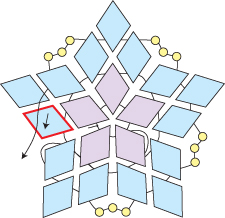
Step 6: String two Color2 Mini GemDuo beads and go up through the outside hole of the Color1 Mini GemDuo bead highlighted in RED:
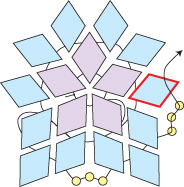
Step 7: String two Color2 Mini GemDuo beads and go across through the outside hole of the Color1 Mini GemDuo bead highlighted in RED:
Step 8: String two Color2 Mini GemDuo beads and go down through the outside hole of the Color1 Mini GemDuo bead highlighted in RED:
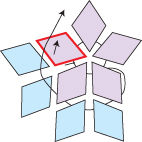
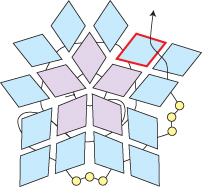
Step 9: String two Color2 Mini GemDuo beads and go down through the outside hole of the Color1 Mini GemDuo bead highlighted in RED. Continue across through the inside hole of the two Color2 Mini GemDuo beads highlighted in RED:
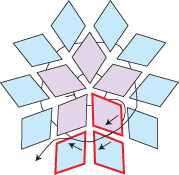
Step 10: Go back around through the outside holes of the Color1 Mini GemDuo beads and the inside holes of the Color2 Mini GemDuo beads highlighted in RED:

Step 11: Go up through the outside hole of the Color1 Mini GemDuo bead and the inside hole of the Color2 Mini GemDuo bead highlighted in RED. Go around and down through the outside hole of the same Color2 Mini GemDuo bead that you just exited:
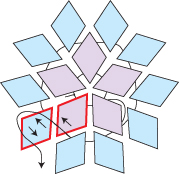
Step 12: String a Color2 Mini GemDuo bead and go through the outside hole of the Color2 Mini GemDuo bead highlighted in RED:
Step 13: String three seed beads. Go up through the outside hole of the Color2 Mini GemDuo bead highlighted in RED:
NOTE: As you add the three seed beads in Step 13 and in the steps that follow, push the middle seed bead into the hollow of the “v” formed by the Mini GemDuo beads.
Step 14: String a Color2 Mini GemDuo bead and go up through the outside hole of the Color2 Mini GemDuo bead highlighted in RED:
Step 15: String three seed beads. Go up through the outside hole of the Color2 Mini GemDuo bead highlighted in RED:
Step 16: String a Color2 Mini GemDuo bead and go up through the outside hole of the Color2 Mini GemDuo bead highlighted in RED:
Step 17: String three seed beads. Go across through the outside hole of the Color2 Mini GemDuo bead highlighted in RED:
Step 18: String a Color2 Mini GemDuo bead and go across through the outside hole of the Color2 Mini GemDuo bead highlighted in RED:
Step 19: String three seed beads. Go down through the outside hole of the Color2 Mini GemDuo bead highlighted in RED:
Step 20: String a Color2 Mini GemDuo bead and go down through the outside hole of the Color2 Mini GemDuo bead highlighted in RED:
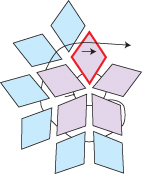
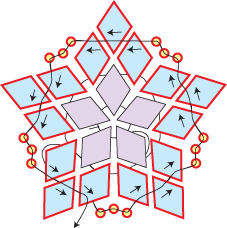
Step 21: String three seed beads. Go down through the three Color2 Mini GemDuo beads highlighted in RED:
Step 22: Go back around through the beads highlighted in RED. Don’t pull so tightly that the motif buckles. Try to keep the motif flat:
Step 23: Go across through the three seed beads highlighted in RED:
Step 24: String three seed beads and go up through the outside hole of the Mini GemDuo bead highlighted in RED:
Step 25: String three seed beads and go up through the three seed beads highlighted in RED:

Step 26: String three seed beads and go up through the outside hole of the Mini GemDuo bead highlighted in RED.
String three more seed beads and go up through the three seed beads highlighted in RED:
Step 27: String three seed beads and go across through the outside hole of the Mini GemDuo bead highlighted in RED.
String three more seed beads and go down through the three seed beads highlighted in RED:
Step 28: String three seed beads and go down through the outside hole of the Mini GemDuo bead highlighted in RED.
String three more seed beads and go down through the three seed beads highlighted in RED:
Step 29: String three seed beads and go down through the outside hole of the Mini GemDuo bead highlighted in RED.
String three more seed beads and go across through the six seed beads highlighted in RED:
Next you will add seed beads around the tip of each Mini GemDuo bead.
Step 30: String three seed beads. Go around the tip of the Mini GemDuo bead and up through the nine seed beads highlighted in RED:

Step 31: String three seed beads. Go around the tip of the Mini GemDuo bead and up through the nine seed beads highlighted in RED:

Step 32: String three seed beads. Go around the tip of the Mini GemDuo bead and down through the nine seed beads highlighted in RED:
Step 33: String three seed beads. Go around the tip of the Mini GemDuo bead and down through the nine seed beads highlighted in RED:
Step 34: String three seed beads. Go around the tip of the Mini GemDuo bead and across through the ten seed beads highlighted in RED:
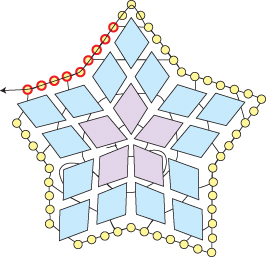
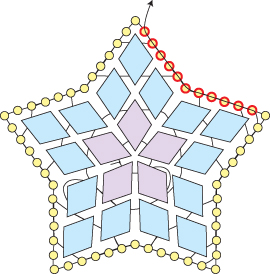
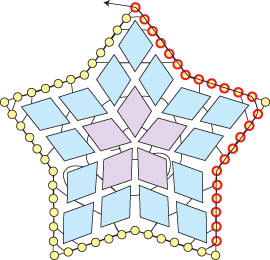
Step 35: Skip the next seed bead at the tip of the Mini GemDuo bead and go across through the next eleven seed beads highlighted in RED, pulling tight so that the skipped seed bead pops out to create a point:
NOTE: If you prefer a more rounded tip instead of a pointed tip, instead of skipping the seed bead, go through it in this step an all subsequent steps.
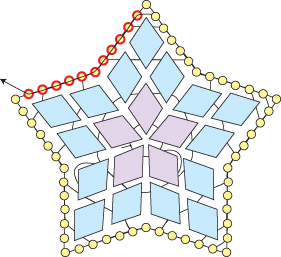
Step 36: Skip the next seed bead at the tip of the Mini GemDuo bead and go up through the next eleven seed beads highlighted in RED, pulling tight so that the skipped seed bead pops out to create a point:
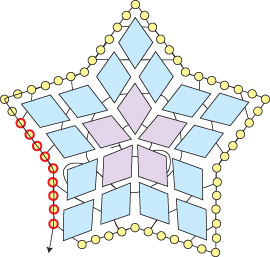
Step 37: Skip the next seed bead at the tip of the Mini GemDuo bead and go down through the next eleven seed beads highlighted in RED, pulling tight so that the skipped seed bead pops out to create a point:
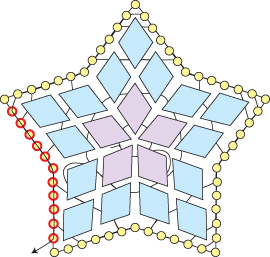
Step 38: Skip the next seed bead at the tip of the Mini GemDuo bead and go down through the next eleven seed beads highlighted in RED, pulling tight to create a point:
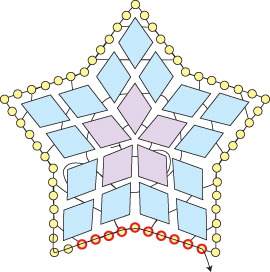
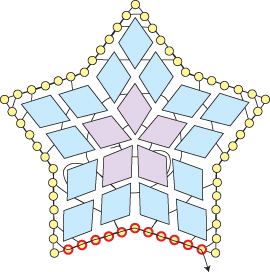
Step 39: Skip the next seed bead at the tip of the Mini GemDuo bead and go across through the next eleven seed beads highlighted in RED, pulling tight to create a point:
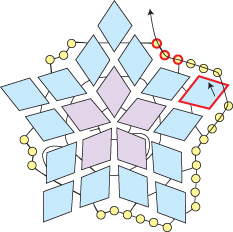
Step 40: Go back around through the seed beads highlighted in RED to exit from the top seed bead:
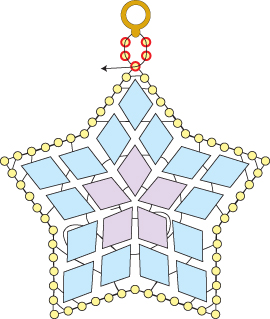
I have included two different ways to connect your earring motif to your earring finding. Pick the one you like best.
Closed Jump Ring
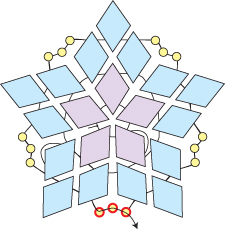
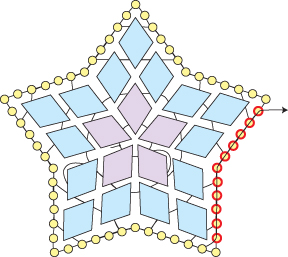
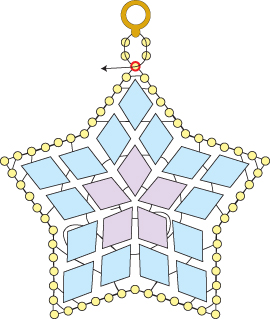
Step 41: To add a closed jump ring, string three seed beads. Go through your jump ring and then back down through the last seed bead that you just strung. String two more seed beads and go back across through the seed bead at the top of the star (highlighted in RED):
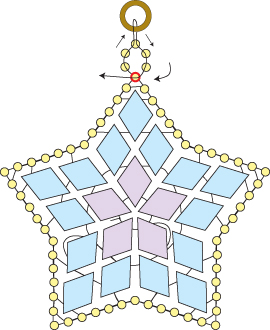
Step 42: Go back around through the beads highlighted in RED and your jump ring:
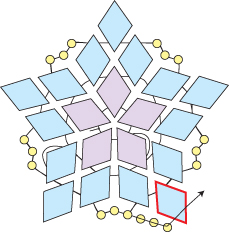
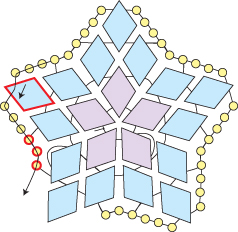
Weave back around through the outer edge of beads along the earring motif again, knot and cut your thread.
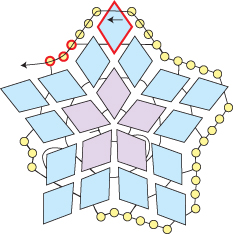
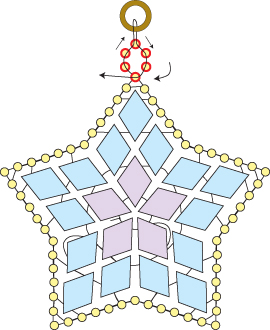
Cymbal Element
Many of the Beadsmith Cymbal™ elements work great instead of jump rings.
Step 41: String two seed beads. Go through a Cymbal element. String two more seed beads. Go around and back across through the top seed bead on the motif (highlighted in RED):
Step 42: Go back around through the beads highlighted in RED and the Cymbal element:
Weave back around through the outer edge of beads along the earring motif again, knot and cut your thread.


