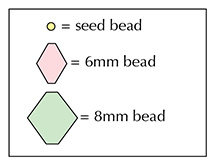
Crescent Link Bracelet
(©2019 Deborah Roberti)

I've had some Crescent beads for quite some time but never really played with them until now. I love the way they look when stacked together to make this simple bracelet using Crescent beads, Miyuki rocaille seed beads and 6x6mm Czech 2-hole Tile beads. For a wrap bracelet, simply triple or quadruple the length of the bracelet and the number of beads used.
(for a 6.5-inch bracelet, not including clasp)
• About 3 yards of 6 lb. FireLine
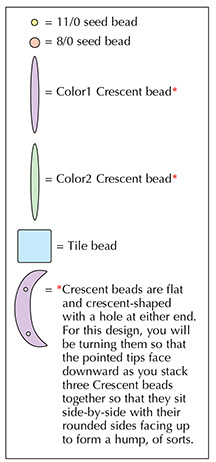
• About 200 Miyuki size 11/0 rocaille seed beads (Toho brand may prove to be a bit too fat)
• About 16 size 8/0 rocaille seed beads
• About 14 Color1 Crescent beads*
• About 7 Color2 Crescent beads*
• About 8 size 6x6mm Czech 2-hole tile beads (Czechmates or any 6x6mm brand)
• clasp
*You can, of course, use just one color of Crescent beads or three different colors.
For a wrap bracelet, simply triple or quadruple the length of the band and the number
of beads used!
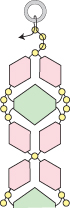
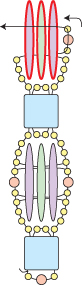
Step 1: Thread your needle with about 3 yards of FireLine (or start with a length that you feel comfortable with and add more later).
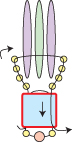
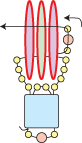
Leaving about a 10-inch tail for attaching the clasp, string an 11/0 seed bead, an 8/0 seed bead and an 11/0 seed bead.
Holding on to the end of the thread, go up through the right hole of a Tile bead, around and down through the left hole of this same Tile bead.
Tie the beads together with a tight double knot:
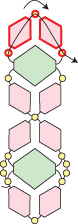
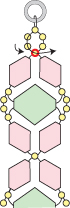
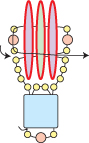
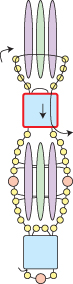
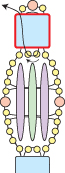
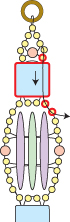
Step 2: Go back up through the left hole of this same Tile bead (highlighted in RED):
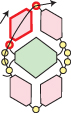
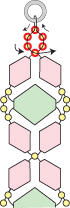
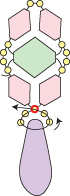
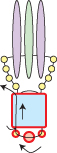
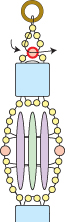
Step 3: String four 11/0 seed beads, a Color1 Crescent bead, a Color2 Crescent bead, a Color1 Crescent bead and four more 11/0 seed beads.
Go around and down through the right hole of the Tile bead below (highlighted in RED):
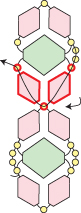
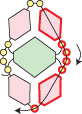
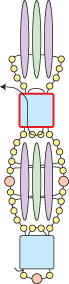
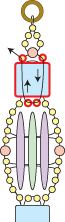
Step 4: Go back around through the 11/0 seed bead, the 8/0 seed bead and the 11/0 seed bead. Continue up through the left hole of the Tile bead (all beads highlighted in RED):
Step 5: String two 11/0 seed beads.
Go back down through the right hole of the Tile bead below. Go around through the 11/0 seed bead, the 8/0 seed bead and the 11/0 seed bead under the Tile bead. Continue back up through the left hole of this same Tile bead (highlighted in RED):
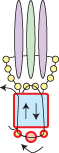
NOTE: You may need to push the two new 11/0 seed beads into place in between the existing 11/0 seed beads on either side.
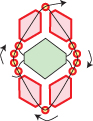
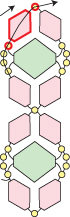
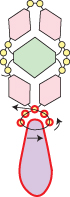
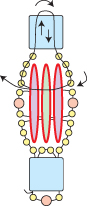
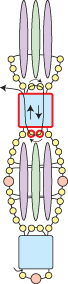
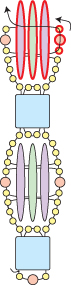
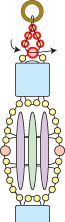
Step 6: Go back up and through the four 11/0 seed beads and across through the bottom hole of the three Crescent beads highlighted in RED:
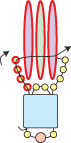
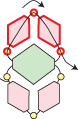
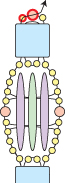
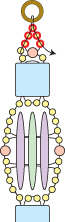
Step 7: String an 11/0 seed bead, an 8/0 seed bead and an 11/0 seed bead. Go around and across through the top hole of these same three Crescent beads (highlighted in RED):
Step 8: String an 11/0 seed bead, an 8/0 seed bead and an 11/0 seed bead. Go around and across through the bottom hole of these same three Crescent beads (highlighted in RED):
Step 9: Go back up through the 11/0 seed bead, the 8/0 seed bead and the 11/0 seed bead highlighted in RED. Continue across through the top hole of the three Crescent beads highlighted in RED:

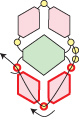
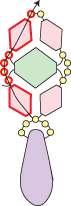
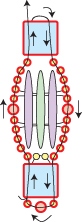
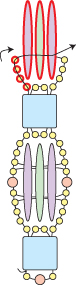
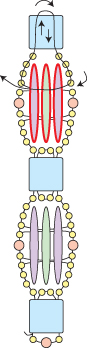
Step 10: String four 11/0 seed beads.
Go up through the left hole of a new Tile bead, around and down through the right hole of this same Tile bead.
String four more 11/0 seed beads.
Go across through the top hole of the three Crescent beads below (highlighted in RED):
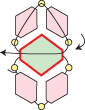
Step 11: Go back up through the four 11/0 seed beads and the left hole of the Tile bead highlighted in RED:

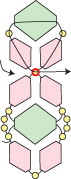
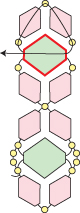
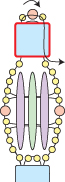
Step 12: Go back around through the outer ring of beads highlighted in RED, straightening seed beads as you do:
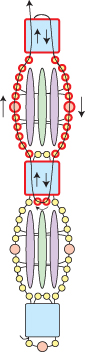
Step 13: String four 11/0 seed beads, a Color1 Crescent bead, a Color2 Crescent bead, a Color1 Crescent bead and four more 11/0 seed beads.
Go around and down through the right hole of the Tile bead below (highlighted in RED):
Step 14: String two 11/0 seed beads. Go up through the left hole of this same Tile bead (highlighted in RED):
NOTE: You may need to push the two new 11/0 seed beads into place in between the existing 11/0 seed beads on either side.
Step 15: String two 11/0 seed beads.
Go back down through the right hole of the Tile bead below. Go around through the two 11/0 seed beads that you just added in the last step. Continue back up through the left hole of this same Tile bead (highlighted in RED):
NOTE: Again, you may need to push the two new 11/0 seed beads into place in between the existing 11/0 seed beads on either side.
Step 16: Go back up and through four 11/0 seed beads and across through the bottom hole of the three Crescent beads highlighted in RED:
Step 17: String an 11/0 seed bead, an 8/0 seed bead and an 11/0 seed bead. Go around and across through the top hole of these same three Crescent beads (highlighted in RED):
Step 18: String an 11/0 seed bead, an 8/0 seed bead and an 11/0 seed bead. Go around and across through the bottom hole of these same three Crescent beads (highlighted in RED):

Step 19: Go back up through the 11/0 seed bead, the 8/0 seed bead and the 11/0 seed bead highlighted in RED. Continue across through the top hole of the three Crescent beads highlighted in RED:
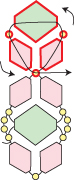
Step 20: String four 11/0 seed beads.
Go up through the left hole of a new Tile bead, around and down through the right hole of this same Tile bead.
String four more 11/0 seed beads.
Go across through the top hole of the three Crescent beads below (highlighted in RED):
Step 21: Go back up through the four 11/0 seed beads and the left hole of the Tile bead highlighted in RED:

Step 22: Go back around through the outer ring of beads highlighted in RED, straightening seed beads as you do:
Step 23: Repeat Step 13 to Step 22 until your bracelet is the length you want it, minus about a half-inch and the length of your clasp:

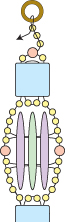
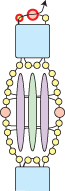
Step 24: To one end of your clasp, string an 11/0 seed bead, an 8/0 seed bead and an 11/0 seed bead.
Go around and down through the right hole of the Tile bead below (highlighted in RED):
Step 25: String two 11/0 seed beads. Go around and up through the left hole of this same Tile bead (highlighted in RED):
NOTE: Again, you may need to push the two new 11/0 seed beads into place in between the existing 11/0 seed beads on either side.
Step 26: Go back across through the 11/0 seed bead and the 8/0 seed bead highlighted in RED:
Step 27: String three 11/0 seed beads.
Go through your clasp and then back down through the last 11/0 seed bead that you just strung:
Step 28: String two 11/0 seed beads.
Go back across through the top-most 8/0 seed bead (highlighted in RED):
Step 29: Go back around through the 11/0 seed beads highlighted in RED and the clasp, exiting once again from the 8/0 seed bead:
Step 30: Go back around through the beads highlighted in RED:
Step 31: String an 11/0 seed bead.
Go up through the three seed beads above (so that the new 11/0 seed bead fills the gap), around through your clasp and then back down through the seed beads below (all beads highlighted in RED):
Step 32: String another 11/0 seed bead.
Go down through the 11/0 seed bead below (so that the new 11/0 seed bead fills the gap), the right hole of the Tile bead and the two 11/0 seed beads (all beads highlighted in RED):
Use your extra tail thread to go back through the beads along the outer edge of both sides of your bracelet. This will help straighten out any seed beads along the motif edges that seem wonky.
Knot in several places and cut your thread.
Step 33: To attach the clasp to the other end of your bracelet, thread your needle with the tail thread from Step 1.
Go across through the seed beads highlighted in RED:
Repeat Steps 27-32.