

Slinky Bracelet & Eearrings
(©2018 Deborah Roberti)

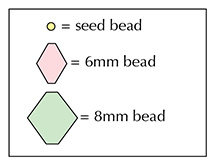
Use size 11/0 seed beads, 6mm and
8mm crystal beads (bicone or fire-polished) to make this easy but
dazzling bracelet and some matching earrings.

MATERIALS: Bracelet
• Three yards of 6 lb. FireLine
• About 100 size 11/0 seed beads (Miyuki brand rocaille preferred)
• About 40 size 6mm beads (bicone crystal or fire-polished beads)
• About 10 size 8mm beads (bicone crystal or fire-polished beads)
• clasp
MATERIALS: Earrings
• Four feet of 6 lb. FireLine
• About 80 size 11/0 seed beads (Miyuki brand preferred)
• 8 size 6mm beads (bicone crystal or fire-polished beads)
• 2 size 8mm beads (bicone crystal or fire-polished beads)
• Two top-drilled crystal pendants or briolettes of any size
• Two small (2-4mm) jump rings
• A pair of earring findings
Step 1: Thread your needle with about 3 yards of FireLine (or start with a length that you feel comfortable with and add more later).
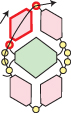
Leaving about a 10-inch tail for attaching one end of your clasp, string a 6mm bead, a seed bead, a 6mm bead, a seed bead, an 8mm bead and a seed bead.
Tie the beads together with a double knot, forming a triangle of beads:

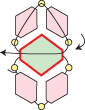
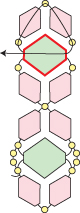
Step 2: Go back around through this triangle of beads that you just strung (highlighted in RED):

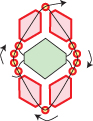
Step 3: String a seed bead, a 6mm bead, a seed bead, a 6mm bead and a seed bead.
Go around and back across through the 8mm bead that you exited at the end of the last step (highlighted in RED):
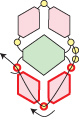
Step 4: Go back around through the seed bead, the 6mm bead, the seed bead, the 6mm bead and the seed bead that you added in the last step (highlighted in RED):
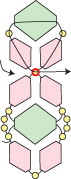
Step 5: String two seed beads (or however many you need to fill the gap between the two seed beads along the edge of the 8mm bead).
Go back around through the seed bead, the 6mm bead, the seed bead, the 6mm bead and the seed bead (highlighted in RED):
Step 6: String two more seed beads (or however many you need to fill the gap between the two seed beads along the edge of the 8mm bead).
Go back up through the seed bead, the 6mm bead and the seed bead, highlighted in RED:
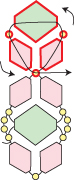
Step 7: Go back around through the beads highlighted in RED to give the motif more strength:
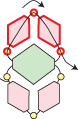
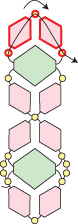
Step 8: To start the next motif, string a 6mm bead, a seed bead, an 8mm bead, a seed bead and a 6mm bead. Go around and back across through the seed bead that you exited at the end of the last step (highlighted in RED):
Step 9: Go back around through the beads that you added in the last step (highlighted in RED):
Step 10: Go back around through the 6mm bead, the seed bead and the 8mm bead highlighted in RED:

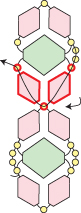
Step 11: String a seed bead, a 6mm bead, a seed bead, a 6mm bead and a seed bead.
Go around and back across through the 8mm bead that you exited at the end of the last step (highlighted in RED):
Step 12: Go back around through the seed bead, the 6mm bead, the seed bead, the 6mm bead and the seed bead that you added in the last step (highlighted in RED):
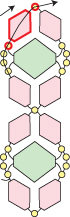
Step 13: String two seed beads (or however many you need to fill the gap between the two seed beads along the edge of the 8mm bead).
Go back around through the seed bead, the 6mm bead, the seed bead, the 6mm bead and the seed bead (highlighted in RED):
Step 14: String two more seed beads (or however many you need to fill the gap between the two seed beads along the edge of the 8mm bead).
Go back up through the seed bead, the 6mm bead and the seed bead, highlighted in RED:
Step 15: Go back around through the beads highlighted in RED to give the motif more strength:

Step 16: Repeat Step 8 to Step 15 until your bracelet is the length you want it, minus about a third-inch and the length of your clasp:

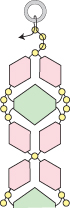
Step 17: To attach one end of the clasp, string three seed beads.
Go through your clasp and then back down through the last seed bead that you just strung:
NOTE: To make your band longer, just add more beads (or larger beads) than directed in this step and the next.
Step 18: String two more seed beads. Go back across through the seed bead highlighted in RED:
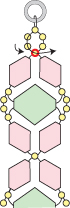
Step 19: Go back around through the seed beads highlighted in RED and the clasp several times:
Weave back into your bracelet, knot in several places and then cut your thread.
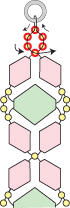
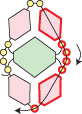
Step 20: To attach the clasp to the other side of your bracelet, thread your needle with the thread tail from Step 1.
Weave your way up through the 6mm bead and the seed bead highlighted in RED:

Repeat Steps 17 to 19.
SLINKY EARRINGS

MATERIALS: Earrings
• Four feet of 6 lb. FireLine
• About 80 size 11/0 seed beads (Miyuki brand preferred)
• 8 size 6mm beads (bicone crystal or fire-polished beads)
• 2 size 8mm beads (bicone crystal or fire-polished beads)
• Two top-drilled crystal pendants or briolettes of any size
• Two small (2-4mm) jump rings
• A pair of earring findings
To make the earrings, complete Steps 1-6 with two exceptions:
• Start with just two feet of FireLine and leave a 6-inch tail that you can weave in and cut anytime.
• In Step 3, string a seed bead, a 6mm bead, two seed beads, a 6mm bead and a seed bead so that you end up with two seed beads at the top of the motif instead of one:

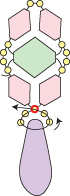
Step 7: Go back down through beads highlighted in RED:
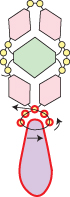
Step 8: To add a drop, string two (or more) seed beads. Go across through your top-drilled bead.
String two (or more) seed beads and go across through the seed bead that you exited at the end of the last step (highlighted in RED):
Step 9: Go back around through the beads that you added in the last step (highlighted in RED):
Step 10: Go back up through the beads highlighted in RED:
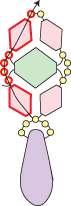
Step 11: To add the jump ring, string a seed bead. Go through your jump ring and then back down through the seed bead that you just strung. Go back around through the beads highlighted in RED:

Step 12: Go back around through the beads highlighted in RED and the jump ring:

Weave back into the earring, knot and cut your thread. Attach your earring finding to your jump ring.
No comments:
Post a Comment