Halo Earrings
Some easy earrings to match my Honeycomb Stacker pattern and highlight your favorite Honeycomb beads. Halo Earrings: Free earring pattern! Although I use Honeycomb beads, 6x6mm Czech 2-hole tile beads, cabochon beads and DiscDuo beads also work great.
MATERIALS
• Two yards of 6 lb. FireLine
• About 100 size 11/0 seed beads (Miyuki brand rocaille preferred)
• 14 size 3mm fire-polished beads
• 12 two-hole 6x6mm Czech Honeycomb beads
• Two small (2-4mm) jump rings
• A pair of earring findings
• Two yards of 6 lb. FireLine
• About 100 size 11/0 seed beads (Miyuki brand rocaille preferred)
• 14 size 3mm fire-polished beads
• 12 two-hole 6x6mm Czech Honeycomb beads
• Two small (2-4mm) jump rings
• A pair of earring findings
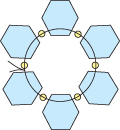
Step 1: Thread your needle with about a yard of FireLine.
String a Honeycomb bead, a seed bead, a Honeycomb bead, a seed bead, a Honeycomb bead, a seed bead, a Honeycomb bead, a seed bead, a Honeycomb bead, a seed bead, a Honeycomb bead and a seed bead.
Leaving about a six-inch tail that you can weave in and cut at any time, tie the beads in a circle with a tight double knot:
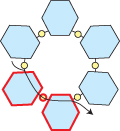
Step 2: Go back around through the Honeycomb bead, the seed bead and the Honeycomb bead that you just added (highlighted in RED):
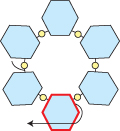
Step 3: Go around and across through the outside hole of the Honeycomb bead that you just exited (highlighted in RED):
Next you’ll add seed beads and fire-polished beads in between the outside holes of each Honeycomb bead.
Step 4: String a seed bead, a fire-polished bead and a seed bead. Go up through the outside hole of the Honeycomb bead highlighted in RED:
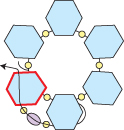
Step 5: String a seed bead, a fire-polished bead and a seed bead. Go up through the outside hole of the Honeycomb bead highlighted in RED:
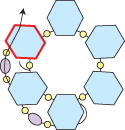
Step 6: String a seed bead, a fire-polished bead and a seed bead. Go across through the outside hole of the Honeycomb bead highlighted in RED:
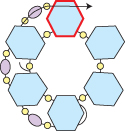
Step 7: String a seed bead, a fire-polished bead and a seed bead. Go down through the outside hole of the Honeycomb bead highlighted in RED:
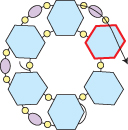
Step 8: String a seed bead, a fire-polished bead and a seed bead. Go down through the outside hole of the Honeycomb bead highlighted in RED:
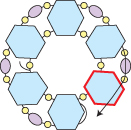
Step 9: String a seed bead, a fire-polished bead and a seed bead. Go across through the outside hole of the Honeycomb bead, the seed bead, the fire-polished bead and seed bead highlighted in RED:
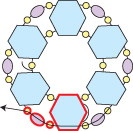
Next you’ll add seed beads around the outer edge of each Honeycomb bead.
Step 10: String four seed beads. Go around (but not through) the outer edge of the Honeycomb bead and through the seed bead, the fire-polished bead and the seed bead highlighted in RED:
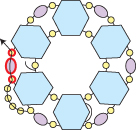
Step 11: String four seed beads. Go around (but not through) the outer edge of the Honeycomb bead and through the seed bead, the fire-polished bead and the seed bead highlighted in RED:
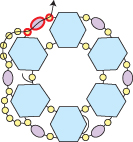
Step 12: String four seed beads. Go around (but not through) the outer edge of the Honeycomb bead and through the seed bead, the fire-polished bead and the seed bead highlighted in RED:
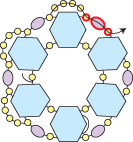
Step 13: String four seed beads. Go around (but not through) the outer edge of the Honeycomb bead and through the seed bead, the fire-polished bead and the seed bead highlighted in RED:
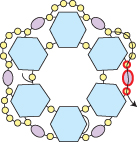
Step 14: String four seed beads. Go around (but not through) the outer edge of the Honeycomb bead and through the seed bead, the fire-polished bead and the seed bead highlighted in RED:
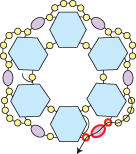
Step 15: String four seed beads. Go around (but not through) the outer edge of the Honeycomb bead and through the seed bead, the fire-polished bead and the seed bead highlighted in RED:
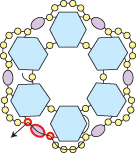
Step 16: Go back around through the outer ring of beads highlighted in RED:

Step 17: Go back up through the beads highlighted in RED:
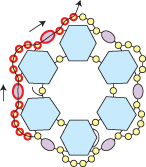
Step 18: String a fire-polished bead and a seed bead. Go around through your jump ring and then back down through seed bead and fire-polished bead that you just strung. Continue through the seed bead highlighted in RED:
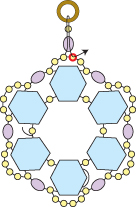
Step 19: Go back around through the outer ring of beads highlighted in RED:
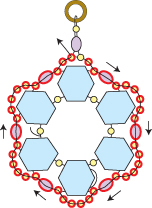
Step 20: Go back around through the jump ring and outer ring of beads highlighted in RED:

A free matching Honeycomb Stacker is available on my website here:
https://www.aroundthebeadingtable.com/Tutorials/HoneycombStacker.html
https://www.aroundthebeadingtable.com/Tutorials/HoneycombStacker.html




No comments:
Post a Comment